413Reasons
Member
Hi everyone,
I've made a Photo Garage called "Workin' in the rust cave" (http://www.forcbodiesonly.com/mopar-forum/showcase/workin-in-the-rust-cave.1308/). It's the story of turning this:

into this:
But there's not enough place to answer the questions, so I create a new post here. So, what have I done?
1.) brushing and grinding everything down to the metal.
2.) using a two-step rust converter and epoxy enamel to create a smooth and clean surface
3.) primer. Lots of it - about six spray cans - a regular one for the "floor" and a fine one for the wheel houses. Sanded everything with 400'- and 800'-sanding paper.
Then @70GTbasketcase asked me, how I got this finish only with spray cans and I went out of space... ...so I put my answer here:
Depending on the spray paint: It works, if you buy good stuff with good spray nozzles. Try to get these ones:

And. You. Have. To. Be. Patient. Prepare all surfaces well. Remove fingerprints and dirt. Use tacky cloth to clean everything and to remove dust after every step. The paint finish is only the topping on the cake and was done in three days in my garage, the preperation before took more than two weeks. While painting, work slowly in many thin layers. I needn't polish at the end, cause everything was smooth. And if you want to spray the inside of a C-Body-trunk, you will need at least 6 spray cans. I used 11 (jup, that's about 4 litres).
Well, where do you find the good stuff? Go to a professional dealer, who sells good stuff (that's usually not your local DIY-shop or your parts dealer) and tell them, what you want to do. Follow their instructions and don't try to save money on sanding paper, primer or paint. I spent about $300 for everything - brushes, sanding paper, all the chemicals, tacky cloth, whatever. And I was so much more satisfied than when I worked with regular DIY-shop-stuff!
I've made a Photo Garage called "Workin' in the rust cave" (http://www.forcbodiesonly.com/mopar-forum/showcase/workin-in-the-rust-cave.1308/). It's the story of turning this:
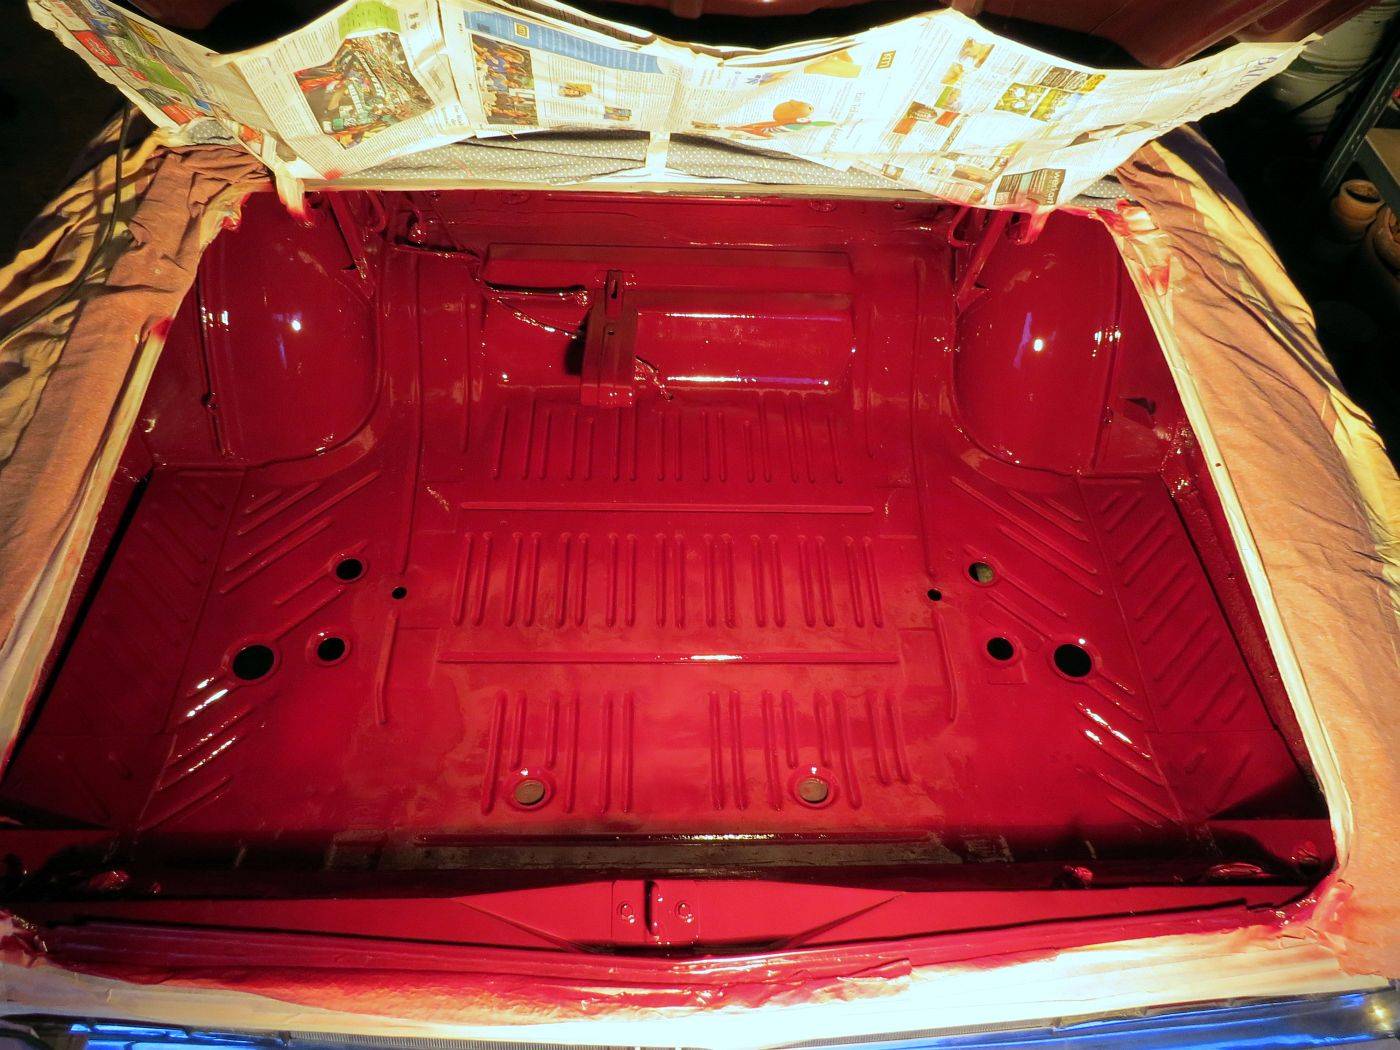
into this:
But there's not enough place to answer the questions, so I create a new post here. So, what have I done?
1.) brushing and grinding everything down to the metal.
2.) using a two-step rust converter and epoxy enamel to create a smooth and clean surface
3.) primer. Lots of it - about six spray cans - a regular one for the "floor" and a fine one for the wheel houses. Sanded everything with 400'- and 800'-sanding paper.
Then @70GTbasketcase asked me, how I got this finish only with spray cans and I went out of space...
...so I put my answer here:Depending on the spray paint: It works, if you buy good stuff with good spray nozzles. Try to get these ones:
And. You. Have. To. Be. Patient. Prepare all surfaces well. Remove fingerprints and dirt. Use tacky cloth to clean everything and to remove dust after every step. The paint finish is only the topping on the cake and was done in three days in my garage, the preperation before took more than two weeks. While painting, work slowly in many thin layers. I needn't polish at the end, cause everything was smooth. And if you want to spray the inside of a C-Body-trunk, you will need at least 6 spray cans. I used 11 (jup, that's about 4 litres).
Well, where do you find the good stuff? Go to a professional dealer, who sells good stuff (that's usually not your local DIY-shop or your parts dealer) and tell them, what you want to do. Follow their instructions and don't try to save money on sanding paper, primer or paint. I spent about $300 for everything - brushes, sanding paper, all the chemicals, tacky cloth, whatever. And I was so much more satisfied than when I worked with regular DIY-shop-stuff!
Last edited:


