clair.davis
Member
Looking for chassis repair dimensions, so hopefully "restoration" is the right area for this post.
I have a question for folks with frame repair experience. At some point in the past, my car met something pretty sturdy and the passenger fender & hood were replaced. The front frame horns were also tweaked, and I had a frame shop straighten those out. However, they did not actually put the car on the rack - long, ugly story... Now I'm chasing down things they should have done, and fixing a lot of the things they did do, and actually checking the frame dimensions is the job of the day.
I'm checking everything downstream of the frame horns, and the very first cross brace is where I'm at. Using the diagram below, the front cross brace is on the left. The instructions say that when measuring the frame using the holes shown, you measure to the edge of the hole where the arrow points to a line resting on the edge. Measure to the center of the hole where the arrow points to a line that bisects the hole.
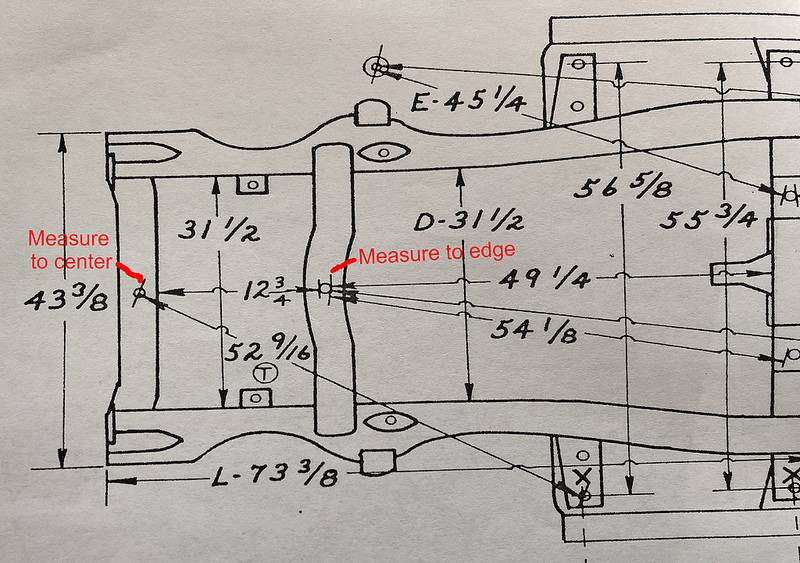 Fury Frame Chart - Front by clair_davis, on Flickr
The question I have is this - the 12-3/4 dimension that measures from the edge of the hole in the second cross brace forward to the rear face of the first cross brace seems odd. Other than some inside-inside dimensions, I don't see any other face-face measurements. Everything else is edge of hole to edge of hole, or otherwise hole to hole. I measure 12" to the face of the cross brace, or 12-5/8" between the edges of the two holes. I would prefer to tweak the cross brace 1/8" vs. 3/4", but I don't want to do anything until I get a feel for what it's supposed to be.
Anyone have another frame chart that shows this dimension? The chart in my 68 FSM doesn't mention this dimension at all.
Thanks!
Clair
I have a question for folks with frame repair experience. At some point in the past, my car met something pretty sturdy and the passenger fender & hood were replaced. The front frame horns were also tweaked, and I had a frame shop straighten those out. However, they did not actually put the car on the rack - long, ugly story... Now I'm chasing down things they should have done, and fixing a lot of the things they did do, and actually checking the frame dimensions is the job of the day.
I'm checking everything downstream of the frame horns, and the very first cross brace is where I'm at. Using the diagram below, the front cross brace is on the left. The instructions say that when measuring the frame using the holes shown, you measure to the edge of the hole where the arrow points to a line resting on the edge. Measure to the center of the hole where the arrow points to a line that bisects the hole.
The question I have is this - the 12-3/4 dimension that measures from the edge of the hole in the second cross brace forward to the rear face of the first cross brace seems odd. Other than some inside-inside dimensions, I don't see any other face-face measurements. Everything else is edge of hole to edge of hole, or otherwise hole to hole. I measure 12" to the face of the cross brace, or 12-5/8" between the edges of the two holes. I would prefer to tweak the cross brace 1/8" vs. 3/4", but I don't want to do anything until I get a feel for what it's supposed to be.
Anyone have another frame chart that shows this dimension? The chart in my 68 FSM doesn't mention this dimension at all.
Thanks!
Clair
