Timing chain replacement.

The puller and installer is cheap at harbor freight and will turn out to be a pretty handy thing to have on hand. However I wouldn't use a bolt to pull the balancer onto the crank. You run the risk of the bolt breaking in the crank or stripping then you are really in deep crap.

Use a chunk of wood and a decent mallet if you don't wanna grab the tool.

Single bolt cam gear.

The summit chain will treat you well, I am very happy with mine.

I also think its funny these guys scream Cloyes. CLOYES...but didn't even provide a link to one for you to consider.

Its not difficult to type in "Cloyes" on a search. It took me about 3 seconds to find retailers like Summit, Partsgeek, O'Reilly, NAPA.......
 
Its not difficult to type in "Cloyes" on a search. It took me about 3 seconds to find retailers like Summit, Partsgeek, O'Reilly, NAPA.......
Understood, but the OP took the time to provide us with a link to the actual part he was considering...no one responded with a part number or link to the part they were recommending for him.

I'm not against Cloyes at all, good stuff. However, I have had great success with the summit chain being discussed. That's why I'm here.

10-4 ! Thanks again for your insight.
 
Just about anything is better than 50 year old nylon coated gear. New stock replacement will be better than what's in there now.
 
Alright, the process of disassembly has begun. Although I've done my share of timing chains, this is the first one I'm doing on a 440, so I have a few questions.

First, is it possible to remove the water pump housing and the timing cover without depressurizing the air conditioning system? I have my A/C working very nicely, and I would rather not have to evacuate and refill the system just to get this done.

Next, how many bolts actually secure the water pump housing to the block? I've looked at many pictures of the housing online, but it's not clear how many bolts I need to remove to actually separate it from the motor. The way things are now, I cannot tell if there's another bolt behind the A/C support bracket that I have to remove. I hope this is not the case, because the two remaining bolts that are holding the compressor bracket in place cannot be removed because the compressor pulley is in the way. I suppose I could remove the pulley, but I would like to know in advance if that's actually necessary.

Finally, do I have to remove the NPT fitting for the heater hose to get one of the upper bolts off on the passenger side? I am almost certain that is the case, but I wanted to ask to make sure. I don't think there's any chance in hell that the NPT fitting is going anywhere.....it looks like it's going to be insanely stubborn to remove. I may have to slice some of it off so I can remove the bolt, separate the pump housing, put it on a bench, and finish extracting it after it's out of the car. I'm not looking forward to that. ☹️
 
Six bolts hold the housing to the block, yes one is behind the heater hose pipe nipple. On something old and untouched I usually just leave the heater nipple in place because they are sometimes difficult to get out due to rust, and I've had to drill a few out and then re-tap. Instead I just work out the last obstructed bolt with an end wrench while I hold up the housing. You can also put a couple pieces of 3/8" allthread about 6" long after you pull a couple bolts to support it and make it easier.

As for the AC stuff, because just like the local homes of period, almost none of 60s muscle cars sold in the northwest had AC. I've had about 3 dozen muscle cars I bought locally, none had AC. Someone else can better speak to the AC.

By the way, did you buy the Summit chain?
 
"First, is it possible to remove the water pump housing and the timing cover without depressurizing the air conditioning system?"
Yes it is, but the compressor will have to be unbolted from the block and moved out of the way somewhat.

"but it's not clear how many bolts I need to remove to actually separate it from the motor"
There are two bolts on the front side of the waterpump housing that do not go all the way to the engine, see picture.
lt1GtBy.jpg


"I cannot tell if there's another bolt behind the A/C support bracket that I have to remove"
Yes there is. Luckily, there's no need to remove the compressor pulley.
Those two (or just one, cannot remember) bolts are secured on the rear side of the compressor bracket with a nut (or two). Just unscrew the the nut(s) whilst retaining the front bolt with a wrench.

Good luck and don't forget to share some pictures!
 
Last edited:
Having replaced the timing chain on my 440 a couple of weeks ago, here's my 2 cents.

First, is it possible to remove the water pump housing and the timing cover without depressurizing the air conditioning system? I have my A/C working very nicely, and I would rather not have to evacuate and refill the system just to get this done.

Yes this is possible. I removed the clutch on my compressor so I could remove all the brackets from it. Leaving the compressor connected I let it rest on the K member.

Next, how many bolts actually secure the water pump housing to the block? I've looked at many pictures of the housing online, but it's not clear how many bolts I need to remove to actually separate it from the motor. The way things are now, I cannot tell if there's another bolt behind the A/C support bracket that I have to remove. I hope this is not the case, because the two remaining bolts that are holding the compressor bracket in place cannot be removed because the compressor pulley is in the way. I suppose I could remove the pulley, but I would like to know in advance if that's actually necessary.

There are six bolts that hold the water pump housing to the engine, three on each side. There is a fourth on the drivers side that holds the A/C pump but not to the engine. With mine it wasn't strictly necessary to remove the pulley as long as you unbolt the rear brackets from the top of the engine and remove the whole thing. I found it easier to just remove the pulley, especially if leaving the A/C compressor hooked up.

Finally, do I have to remove the NPT fitting for the heater hose to get one of the upper bolts off on the passenger side? I am almost certain that is the case, but I wanted to ask to make sure. I don't think there's any chance in hell that the NPT fitting is going anywhere.....it looks like it's going to be insanely stubborn to remove. I may have to slice some of it off so I can remove the bolt, separate the pump housing, put it on a bench, and finish extracting it after it's out of the car. I'm not looking forward to that. ☹️

No, the NPT doesn't have to come out. Just remove this bolt as the last one. If all other ones are removed you can use an open ended wrench to unbolt this one while holding the pump housing. With each wrench turn the housing comes a little bit away from the engine. In my case, I did cut off a section on the NPT fitting on the bench so I could separate the alternator bracket from the housing. Made it easier for install later and no leaks but your choice.
 
Not sure where you're at in the process and you'll probably know it already but to share a piece of advice that was given to me, it's best to remove the radiator to avoid damaging it.
 
Cloyes is not what it used to be. AFAIK the best chain available today is Rollermaster. Made in Australia I believe. Will set you back around $120. That is all I use now. Used to only use Cloyes.
 
FWIW, I say replace all the heater hose nipples while you're on this job. I did a double roller replacement of my 54+ yr old chain in my 383 in Dec., 2019. If that one nipple gives you trouble, you can try crushing it, twisting out the remainder, then clean up using an extractor, then a good NPT tap. Odds are that after so many decades, there will be very little metal left in your heater hose nipples, meaning you can't help BUT to crush, twist, then replace. That's a good water pump housing you have too. My next water pump job, I plan to replace the aluminum one I'm currently using with the same sort of iron housing you have. I copped one a couple yrs back dirt cheap, but had no immediate call to use it.
 
I already ordered the Summit set.... Not necessarily because it's inexpensive, but because that set got its share of positive feedback. If I see anything with it that is even slightly amiss upon installation, I will go with something else, but I do not anticipate any problems.

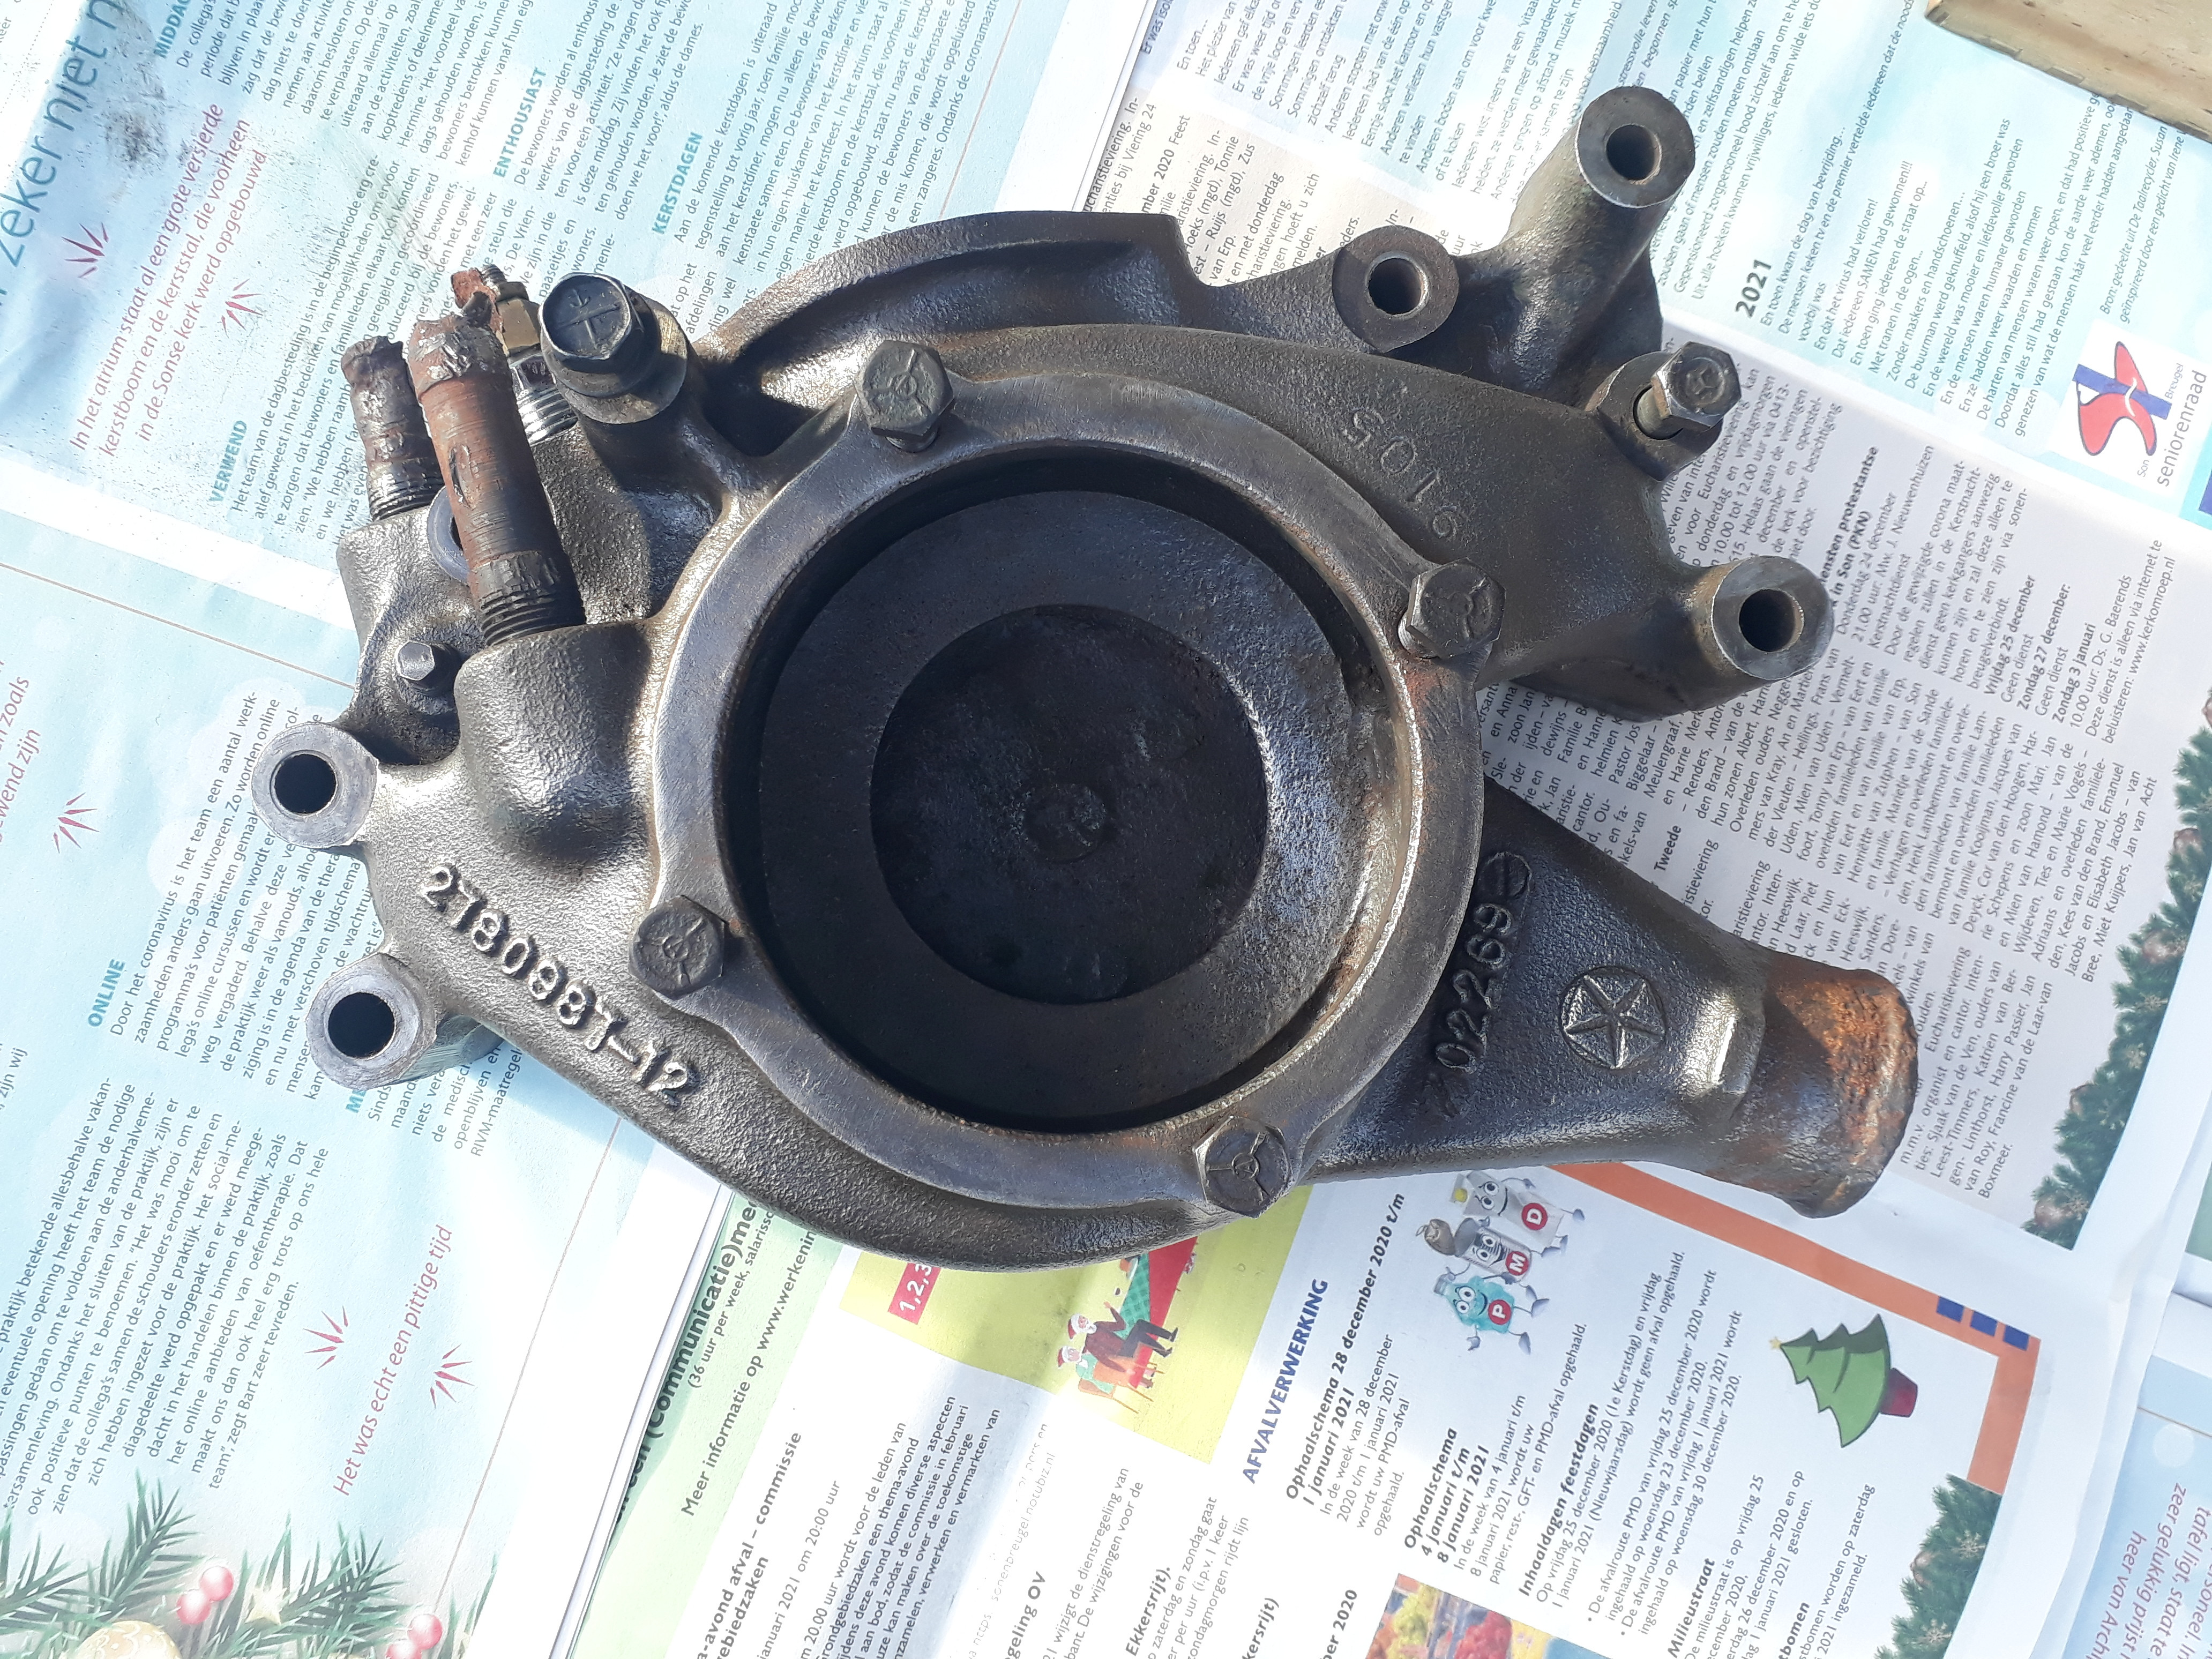
Here are some photos of the process. My guess is that only the top two bolts remain; one behind the heater hose fitting, and one that is shrouded by the A/C support bracket.

I'll be taking this opportunity to clean and paint some of the components. This engine has never been apart for any reason, so there's no shortage of grime and grease on most everything.

IMG_20210404_104604.jpg


IMG_20210404_104718.jpg


IMG_20210404_104823.jpg


IMG_20210404_104846.jpg
 
Another important question....when the Summit gears are installed dot to dot (cam @ 6:00 & crank @ 12:00), where should the distributor rotor be pointing? Some say at #1, others say at #6.

Once I have the correct answer, I will rotate the motor until it is at TDC with the rotor pointing where it needs to, remove the old chain and gears, install the new chain and gears dot to dot, and then finish the reassembly.
 
About your A/C, we don't see a picture or know what kind of service has been done other than your description that: "working very nicely," so from what I see of all the engine grime I would doubt much, so moving your compressor should be minimal with just enough to get at your work at hand. When you start moving old A/C lines who know what can happen if they are aged, crack a tube, or crack the old rubber and seals, move it too much and you maybe doing more than just recharging your system. You may want to make a quick 2x4 wooden frame to wire/hold it up just a little so you don't stress the lines.

Also replace your upper & lower radiator hoses, from the amount of grime I see on them they are doomed to fail. Same for the heater hoses & nipples, that one bolt can be removed with a open end wrench fairly quickly. As far as the nipples go post up a pic and we'll see, but your right in there and they still are available and I would think not that expensive, so... Also I use a Oxy-Acetylene torch to heat up the cast iron at the base of the threads, easiest way to get them out without damaging them. Heat and spin them right out, don't beat yourself up on them.

I vote for taking the radiator out (I learned that one the hard way)

.
 
Another important question....when the Summit gears are installed dot to dot (cam @ 6:00 & crank @ 12:00), where should the distributor rotor be pointing? Some say at #1, others say at #6.

Once I have the correct answer, I will rotate the motor until it is at TDC with the rotor pointing where it needs to, remove the old chain and gears, install the new chain and gears dot to dot, and then finish the reassembly.
This isn't that important. You can leave the distributor in the engine. With the timing cover removed you can align the old chain either wat you want, dot-to-dot or both at 12 o'clock. As long as you put the new one in the same way.

Just in case you do remove distributor, dot-to-dot has the rotor point to #6 and both at 12 o'clock points to #1
 
to prevent crushing pipe nipples slip the largest possible bolt inside and use a well sized pipe wrench. This has proved successful for me for many years working inthe maintenance industry. Hope this helps. Lindsay
 
I actually order a Rollmaster today for my 383. Old cam was a single bolt new is a 3 bolt so needed a new chain. Paid $119.
 
This isn't that important. You can leave the distributor in the engine. With the timing cover removed you can align the old chain either wat you want, dot-to-dot or both at 12 o'clock. As long as you put the new one in the same way.

Just in case you do remove distributor, dot-to-dot has the rotor point to #6 and both at 12 o'clock points to #1


Excellent.

I asked that question because I wasn't sure if the old gears were going to be marked the same way the new gears are. I'm just being thorough. Of course, I have no plans to take the distributor out.
 
Back
Top