Calling Popeye - Help Needed with Hood Hinge Torsion Bar

Boomer

Active Member
Joined
Jul 20, 2015
Messages
406
Reaction score
395
Location
Gum Spring, VA
All the spinach you can eat.....call now....

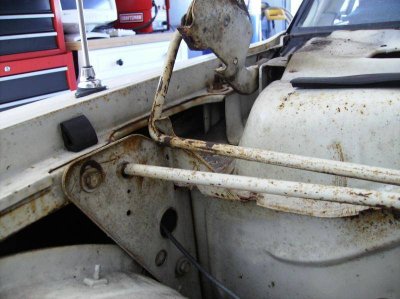
It finally dried up enough this afternoon to get after the hood on the 300 again. Have already tried to install the hinge on the pivot then engage the torsion bar afterward. No way. So this time I tried hooking the torsion bar into the hinge plate with it installed only on the hood. Had to beat the hinge first to get some of the twist out of it. This has happened a few times before I got the car.

So I got the cowl cover off, hinge straightened out (more or less), bolted to the hood, and wrestled the hood around to get the torsion bar roller into its channel. Success, but! I can't get the hinge back far enough to engage the pivot point. If I lift the hood up as high as I can it will force the roller to the front of the channel like the other side, but at that point between the angle and weight of the hood, I just don't have the snot to load the torsion bar enough.

Looked through the service manual and found some diagrams of the hinges, but no procedure for hooking it all together, though I may have missed it. Thought about tying rope around it and figuring out a way to winch it back, but that seemed a bit.....foolish, as well as dangerous. That's when Popeye's bowling pin forearms came to mind.

A couple photos below of where I left off earlier. Need to mow and catch up on other chores tomorrow, but would really like to get at least one small victory on this project before the weekend is over. Still plenty to do after this, but it's the most annoying issue. It's running like crap right now, so being able to work under the hood without fear of death is a must.

Hinge7.jpg


Hinge6.jpg
 
Here is a picture of my hood hinge with the spring installed. This picture is when I removed my springs four years ago, with the hood off first. If I remember right I used a tool attached to the spring for leverage.
~

todays pics 043.jpg
 
Last edited:
Wow, that is a screwy design! How late did they use torsion bars? I think I'd be retro fitting springs from '69-'71, or modern strong arms for the hood. They are used in the trunk of my '70 300 and are a PITA.
 
Here is a picture of my hood hinge with the spring installed. This picture is when I removed my springs four years ago, with the hood off first. If I remember right I used a tool attached to the spring for leverage.
~

How did you leverage it back on without the hood's weight and stability to keep it lined up? There's nothing to really hold it in place on the roller except that small lip of the channel, and not much place to hook anything to the spring aside from maybe a chain or rope.

Haven't tried it without the hood yet, that was next. Just thought having the weight of the hood would be necessary due to the strength of the bar as you load it. But the hood is pretty unwieldy overall and doesn't make a very good lever.

It's a pretty slick design once it's in place. Servicing it is the PITA part.
 
My trick for installing the torsion bars is to use a ratcheting strap hooked on to the door handle to the bar. Just ratchet in place and your done. Put the hinge on the pivot first.
 
My trick for installing the torsion bars is to use a ratcheting strap hooked on to the door handle to the bar. Just ratchet in place and your done. Put the hinge on the pivot first.

I like that idea. Seems like a safe way to get it done.
 
Last edited:
Wow, that is a screwy design! How late did they use torsion bars? I think I'd be retro fitting springs from '69-'71, or modern strong arms for the hood. They are used in the trunk of my '70 300 and are a PITA.

Torsion Bars were used until 1979. It's one of the ways to tell a 79 Cordoba/ Magnum from a 78...Chrysler transitioned to the snail shell springs across the board that year.

Actually the torsion bars work extremely well for holding up such heavy hoods.
 
My trick for installing the torsion bars is to use a ratcheting strap hooked on to the door handle to the bar. Just ratchet in place and your done. Put the hinge on the pivot first.

Ahhh, that's what I was looking for. Thanks! Hadn't thought of that, it makes good sense. I'm guessing you didn't rip your door handle off, so it must take the tension just fine. Even have a new ratchet strap out in the garage, only used once.

Got the roller back out of the hinge tonight but ran out of daylight. Will give it a go tomorrow, looking forward to it. Got the chores done today, including the mowing with the help of the supervisor. So tomorrow is open for the car project.

TractorBuddies.jpg
 
It's funny you should ask that, John. She did not. Didn't want her around if anything let go, though I'm sure she would've loved to "help". She's quite a talker for not-quite-3 yrs old.

However - I did actually get it done, just a couple hours ago. First chance to get back to it came late afternoon today. Between work, preschool, rain, and everything else here it's been a full week.

At the risk of looking like Jethro Bodean in my approach, here are a few photos. Ended up going with nylon rope as there were a few problems with the ratchet strap approach: the strap I have is too short and made for those moving van 'quick rails' or whatever, plus the mirror was smack in the way. So I improvised with the rope, Ranger pickup, and sledge hammer.

Took a few pulls to get it back far enough but once it was there the hinge just dropped on. Pretty amazing how strong those torsion bars are. Once it had tension, it would pull my truck backward when I put the clutch in.

So Popeye wasn't needed after all. Now I'm going to need Superman, Mighty Mouse, or someone strong enough to hover overhead holding the hood so I can bolt it back on. I can't quite grab it side-to-side. Doesn't look like something I can do alone, but that's what I thought about the torsion bar. We'll see what tomorrow brings. Levers and blocking.

The first small victory in a long project to come.

Hinge8.jpg


Hinge9.jpg


Hinge10.jpg


Hinge13.jpg


Hinge15.jpg
 
Well done. Bravo.
I've had to do that. First attempt caused a missile barely missing me and going through the wall.
 
I resisted doing it this way just because I was sure something would do just that, and I've gotten to be a lot more cowardly..er...wiser in my older age. Of course, I was sitting in the truck thinking I was safe and sound, not giving a thought to a projectile coming through the back window glass at warp speed. (duh). I did see some small puffs of dust come from the rope as it tightened up. Not terribly reassuring, but it held.

So the hood is back on. Again, wasn't as bad as I thought it would be. Guess I just got too used to working on newer plastic cars that you can lift the hood on and off easily, tuck it under your arm more or less. Was able to use the hood's own weight and center of gravity to my advantage along with some blocking. Having a windshield already cracked in three places relieved a lot of potential stress, too. Once the front bolts were in the rest went fast.

Getting it back on the hinges was the easy part. Getting it lined up and sitting properly has proven to be a bit more of a challenge. Got it close and called it a day, or almost night by then. Left side is still a bit screwy, but it's nice to have it stay up on its own finally.

Think I need to stop turning every question into another chapter and start a 'project' thread to house the results (especially when things go right). Ask questions, post updates that could hopefully help someone else in the future. I've got stuff related to this car scattered all over the board and I've only been here a couple months.

Hinge16.jpg


Hinge17.jpg


Hinge19.jpg


Hinge21.jpg


Hinge23.jpg


Hinge24.jpg
 
Think I need to stop turning every question into another chapter and start a 'project' thread to house the results (especially when things go right). Ask questions, post updates that could hopefully help someone else in the future. I've got stuff related to this car scattered all over the board and I've only been here a couple months.

Yes please. Build threads are always interesting to read, especially for newbies like me.
Beautiful car by the way, and very clever way of overcoming the issues of working alone!
 
I don't think I've discovered anything new here for most folks, just to me. But I'll definitely start a thread to compile at least the pertinent information as I go along, and still ask questions in the appropriate forums. Who knows, maybe someone else out there is jonesin' for a '66 Chrysler and just doesn't know it yet. If one little tidbit helps, it'll be worth it. I'm a newbie also and have already learned a lot from the members here since joining a couple months back. Only bad thing has been seeing so many other cool cars I'd either forgotten about or never considered. And most can still be had cheap, which concerns me a bit. Self control, self control...
 
Funny you should mention that, I started with one and ended up with 12, I'll end up with 7, 4 here in Australia (2 78 Lincolns, 1 79 Cadillac limousine and 1 Aussie Ford Falcon GT with 450 HP) and 3 in Wisconsin (1 70 Cadillac Fleetwood Brougham with rare sunroof, 1 77 Lincoln sedan coupe convertible conversion, 1 73 Chrysler Imperial LeBaron 4-door sedan).

Better to have one car you can afford to restore well and enjoy, yours looks nice, I'm glad the sledgehammer didn't come loose.
 
I had to go through a similar process butin this order. Unbolt hood from the hinge but leave the torsion bars in place. I'm missing a bushing on the passenegr side hood hing so the torsion bar came off the pivot point on the pass side. To reisntall the hood I made sure that the picot point was in and the attached to the hinge first. Then I used a monkey wrench and a screwdriver to push the torsion bar back into place and onto the hood. An old broom handle was used to secure the hood while only one torsion bar was in palce. No severed heads or arms during the process.
 
Back
Top