My Rust Repair job just got a lot easier!

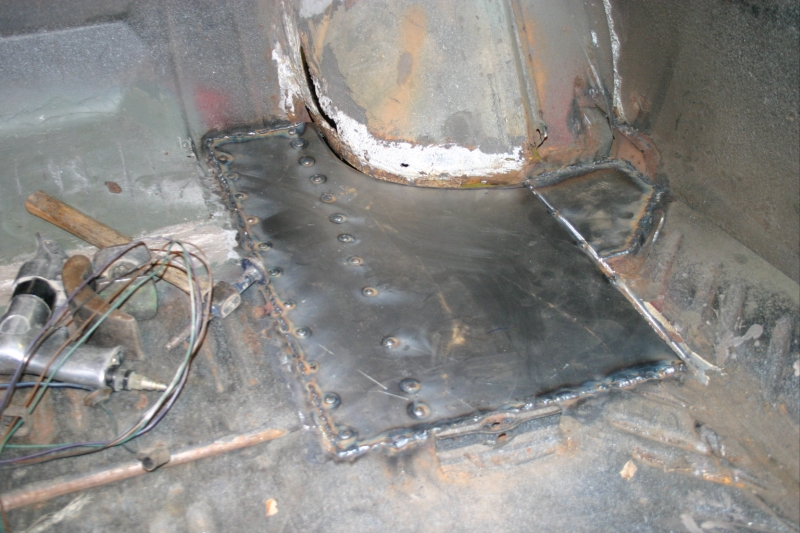
That'll do it! Find any 30-30 holez in that one Chris? Thatz where I first go on to the 3M metal glue, And the big Un-a-bore bitz, lol

No Jer this car was never used for target practice. Most of the time when they sit up there that long they do look like Swiss cheese. Luckily not this one.
 
Well the trunk pan arrived but was damaged so it is heading back to C2C Fabrication this week for a replacement... not that I am waiting on it to move forward.
I have lots to do on this before I am ready for the pan.

C2C was very good about shipping another right away.:yes:

20150206_175935.jpg


20150206_175941.jpg


20150206_175947.jpg


20150206_175959.jpg
 
haha, with the amount of beating that panel is going to need I would have kept it but then again I wouldn't have got it in the first place. Wait to think about it, I did, garbage! Didn't use it, got my money back.


Alan
 
Mr fix it, now that you have your own two hands on it, what do you think of it?

Well it certainly isn't a factory stamping by any means but it sure is better than the paper thin piece of swiss cheese I had... :D

In my parts finding a solid usable trunk floor is near impossible.

I am also not going for a 100 point restoration so this should fit the bill reasonably nicely at the price point it is at.
 
Are there any flanges on it anywhere where it meets adjacent panels???
 
Well it certainly isn't a factory stamping by any means but it sure is better than the paper thin piece of swiss cheese I had... :D

In my parts finding a solid usable trunk floor is near impossible.

I am also not going for a 100 point restoration so this should fit the bill reasonably nicely at the price point it is at.
Myself, I could not care less if every little indentation is an exact match to the original. I am wondering if they got the shape and countours right. In other words, is it a correct fit?
 
Ok, so what did you end up using Alan?
I was going to hold out for a replacement panel but felt the areas that were being patched would never be seen so plain old flat sheet metal was used.
There is going to be a trunk mat and in my car I have equipment and a spare tire bolted down so it would be virtually impossible to see.

Both sides about the same.
2012-08-14_002.jpg


Well it certainly isn't a factory stamping by any means but it sure is better than the paper thin piece of swiss cheese I had...
In my parts finding a solid usable trunk floor is near impossible.
I am also not going for a 100 point restoration so this should fit the bill reasonably nicely at the price point it is at.
My point if that the near nonexistent stampings they put in only look good in pictures or about 50', for the price? I might juts fit flat stock.
My body guy said he could beat the groves in if I wanted, it just takes time.

Are there any flanges on it anywhere where it meets adjacent panels???
ah, no! This has cutouts and bends that do not match anything, like it was made for a Chevy.

Myself, I could not care less if every little indentation is an exact match to the original. I am wondering if they got the shape and contours right. In other words, is it a correct fit?
See my previous comment.


Alan
 
Ok I'm going to settle the trunk floor dilemma very simply. We have three choices for our C body's: Rust free used, Cheap low quality repro's or flat sheet metal made from scratch. I have used all three and in my professional opinion I ranked them in order of desirability. We can keep debating this until the cows come home but since we will never see AMD or anyone else make good quality and fit pieces this is what we have. Now back to your regular programing.
 
Chris has spoken. Good enuff fer me...

Also...
This has cutouts and bends that do not match anything,
That's what I needed confirmed in as much that was my belief to begin with.
Sounds like I saved myself some money.
 
Chris has spoken. Good enuff fer me...

Also...

That's what I needed confirmed in as much that was my belief to begin with.
Sounds like I saved myself some money.

Yes you may have.
I'm going to forge ahead with this one and will let everyone know how it works out.
 
Hello, This application looks familiar, I am presentl installing a complete 4 door floor into a 1960 Mercury Monterey Convert. I found that it was best to take the existing floor out in stages making sure that you leave enough metal around the perimeter for joining floors together. Enjoy the work and take pride in your efforts,,,, Catfish-65 P.S. My 65 Dodge Convert, has super solid floors, I lucked out,,,,,
 
I managed to get one inner fender out last night.
I had debated as to whether or not to repair them while in the car but finally decided to cut them out so I could repair or replace them properly.

It's not a pretty sight...

20150212_202459.jpg


20150212_202452.jpg
 
May not be pretty now but you won't regret it.
 
I just have to get that undercoating off without sandblasting blasting the day lights out of what's left of good metal!
 
Another interesting thing is that the tops of the fenders are flattened out to accommodate the soft top when it is in the down position.

I think they are normal inner fenders but have been modified for this purpose.
 
Not much to report other than this car is definitely going to be lighter with the amount of body filler I have removed! I am almost ready to start with the reassembling stage once I get the frame rails cleaned up.
I took some pics but seem to have lost them :)
I'll post some later tonight!
 
straightening and cleaning

Well last night I was tackling the new to me rear frame rails.
I straightened the rear bumper support and cleaned the right side frame rear.

bent rear bumper support.jpg


20150309_194323.jpg
 
Back
Top