Reason for rough idle finally found! Now I have a few questions.

73 T&C

Senior Member
FCBO Gold Member
Joined
Mar 19, 2013
Messages
2,206
Reaction score
3,460
Location
Coral Gables, Florida
As some of you know - I've suffered from a rough idle on my 73 Town and Country since I got it. With help from many of you I've rebuilt my thermoquad, checked for vacuum leaks and ignition failure areas all over the engine compartment.... The engine ran a little better each time but the lumpy idle just wouldn't go away... very frustrating as you can imagine. Well I finally found it and hear it is.

I finally decided to get serious. Going over to a friends shop which you may know from my posts on the B Bodies site, I was able to use his old SnapOn engine analyzer and I determined my burn time for all my spark plugs was right on spec, Wires had spec resistance and dwell with the electronic ignition was a smooth 41 degrees as expected. Vacuum was at 15 at idle if a little lumpy with a reading of 15-16 inches. Still I had the lumpy idle.

I ended up pulling the plugs after the engine cooled some and found the number three was a little wet with some oil.... needless to say my rear end puckered at the thought of a bad ring. The lumpy idle was tracked to the same cylinder by running the engine with the tach and disconnecting the number 3 plug wire and finding that the idle speed ( set at 1200 rpm for this test) only dropped 30-40 rpm vs to 100 or so rpm for the other cylinders. More puckering....

That tore it. Time to get really serious.

Letting it cool down again. I took the number 3 plug out and ran a compression test.... 40 pounds..... More puckering,,,,

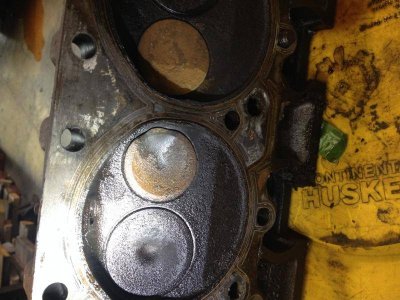
Cylinders 1 and 5 came next and showed 150 psi each.... slight release of pucker as it was looking now to be either a stuck lifter or a valve problem.... Ran compression again on number 3 ( this time with a squirt of oil) and got 60 psi. More release of pucker as this was looking more and more like a bad valve. Ran a leak down test and found enough air coming out of the tail pipe with the test at 90psi to blow out my lighter..... more pucker release - it was a bad valve and it was the exhaust....

And hear it is.....
IMG_2153.jpg


What I cant figure out is that the valve seat looks pretty good but the valve literally looks to be worn out like it had been eroded away. I've never seen that before. Likewise, the top of the valve also shows the same wear aligned with the wear on the face. With the valve shut you can actually see light between the valve and the seat. The top of the valve stem looked smooth as glass but had a very slight crescent raised edge (about a mil) on the top which matches up to the wear on the valve. The rest of the valves looked fine.

The questions I have for you are:

What the hell caused this?

Is this what is known as a burned valve?

How can I prevent this?

Why was this the only affected valve?

IMG_2153.jpg
 
I think that was caused by a blown head gasket in that area. The escaping heated fuel and oxegen between the two cylinders was like a blow torch on that exhaust valve.
 
My educated guess is that you had some carbon stuck on the back side of that valve.

The end result is that the valve doens't close all the way causing leakage of high temps back into the head.

The seat is harder than the valve thus saving the seat but causing the burn on the valve which is a much softer material..

Another possible is a bad valve guide allowing oil to drip down when the engine was off.

When fired up the oil burns causing the blow torch affect mentioned by BullDogChesty above.

either way once that crack in the seal starts, it just accelerates until you get what you see here or even worse if ignored.

Thanks or sharing as well! it's the gremlins that can drive us crazy.

Let us know once it's back together how you make this car run smooth again :)
 
BTW, Are you doing both heads or just repairing the single valve?
 
I ran a compression test on all the cylinders and the number three was the only one that was low. So, I'm just rebuilding the one head. With only 62000 miles, I didn't think I needed to do both now. I figure I'd do both when it came time to rebuild the engine.

However, I am replacing all the valve guide seals on both heads (several were cracked) to see if I can reduce the amount of oil that the engine is burning. I've had 440's before and they have all burned a little oil and leaked a little more than my small blocks. And, by having to replace the valve cover seals, I figure I can cut down on the leaking as well. (The seals were original)

On a separate note, the engine was very clean inside which made me feel better about doing just the one head.
 
If you are sending one head out, you should have the other one done.

Thinking about it..... Will decide tomorrow.

But, beyond the symmetry of doing both sides, what is the advantage? Cost would be another $150 for the head plus labor and parts or about another $450. Cost is not that big an issue but I don't want to just waste money.

Other side is fine and the head I pulled only had that one bad valve. I figured that the rings and main bearings would fail long before either head would.

Thanks for the advice.
 
The internal combustion engine is a very simple thing really. It's kind of like an air pump except thousands of explosions are happening every minute times 8

One head hasn't been touched for 40 years .. the other will be similar or better than new .. that's half the breathing side

All the power potential of an engine is in the breathing possibility ... heads, cam and valve-train and ICE's breath through the heads

The other head is not in that much better shape than the one you showed .. the springs and valve train play a part

how's that?
 
I had a similar problem with my 72 MGB. But that was caused by unleaded gas. A valve literally pounded its way up into the head. I was constantly adjusting the valves until after a long trip it was over. I just couldn't adjust it any more. I pulled the head and found one of the exhaust valves hammered its way up into the head ruining it. I bought a used head and had new guides, valves and hardened seats put in and its been okay ever since. My Advice to you is to get both done, with new guides, valves and seats made for this new **** gas, and be done with it. It will be worth it in the long run. Love your T&C by the way.... mine's a 76. I had a 73 back in the late 70's.
 
If this was 1976 and it was at a garage you'd only do one head. In a stock application I see no issue with only doing one if there is a cost issue. If there's not - just do both. It means both get milled the same, the valve job should add some power and economy to it, and it's one more thing not to worry about.
 
If this was 1976 and it was at a garage you'd only do one head. In a stock application I see no issue with only doing one if there is a cost issue. If there's not - just do both. It means both get milled the same, the valve job should add some power and economy to it, and it's one more thing not to worry about.

You got me with "one more thing not to worry about".

I went this this afternoon and had my friend pull the other head. Let's see how she runs when I'm done. I'll keep you all posted.

There is one more thing that I discovered in the disassembly that I'd like some help with.

image.jpg

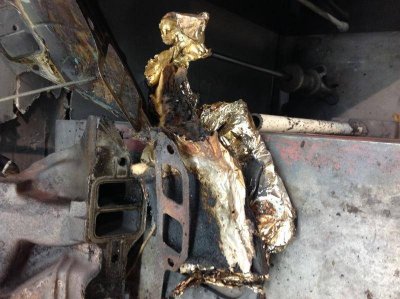
I found this fiberglass tamale wrapped in aluminum foil under the intake manifold.

It appears to be an insulator between the bottom of the intake and the valley cover. My guess is that it was to keep the exhaust cross over from cooking the gallery pan and carbonizing the oil on the underside of the valley cover pan.

When I found it, it literally crumbled in my hand and the portion under the exhaust crossover was oil soaked and had carbonized into a cookie. The underside of the valley cover pan was clean.

Since this is something no one will ever see, my questions are:

Do I need it?

Can I just leave it off? I figure without it, the air can at least move through the gap when it's running or circulate through convection with the engine off.

Wouldn't a reflective Mylar finish on a flat steel panel do better than stuffing the gap full of fiberglass and cutting the airflow to zero?

thanks for all your comments and advice guys!

image.jpg
 
I do think you are right that is an insulation they put on top of the valley pan/ under the intake. toss it and when you get the valley pan get the one with the heat crossover block off
 
That's an interesting comment.

It's been a long time since I did one of these... I didn't think about the foil insulation.
It was there for a reason so let's talk about that.

I believe it was designed to prevent the following.

If the heat riser gets stuck in the closed position the exhaust gases will continue to flow across the intake after it should.

the high heat temps will cause the oil splashing around the intake valley to burn which would turn the oil into fumes resulting in the PCV system working harder plus making it appear that there is an oil consumption issue. - which in reality is an issue..


The foil is good to have if you can keep it there.

I can't say I know of any replacements being offered if you want to replace it.


Blocking off the cross over?

My thoughts on this are,

Depending on where you live and when you drive.

If you live in colder climates then you should not block off the cross over if you drive the car in the colder weather.

It's there to heat up the base of the carb which will give you better running including less carbon build up plus better atomization of the fuel as you drive with a cold engine.

Chrysler had an issue with sludge in the 70's in certain regions of NA especially the north areas.

Presuming that your heat riser is functioning correctly, the cross over only really functions when the heat riser is cold re-directing exhaust heat across the intake to warm the carb.

Once the heat riser opens up then there is next to nothing flowing across the base of the carb which is a good thing for a cold engine.

Once up to operating temps, the heat riser needs to open or it will overheat the base of the carb which could cause vapor lock plus cause your engine to overheat with the constant flow of exhaust heat across the top of the block. Bad news all around :(

If the car is strictly driven in warmer climates then you could block the cross over off (Like Florida) :D

If you drive during cooler/colder weather I would not block it off.

Just make sure the heat riser is working properly and you should be good to go.

In the end it is your decision :)
 
Chrysler's official explanation for the insulation was it was put there to deaden valve train noise. In fact it was called a "valve tappet noise reduction silencer". Secondary reason was supposedly to lessen heat transfer to the intake.
 
Back
Top