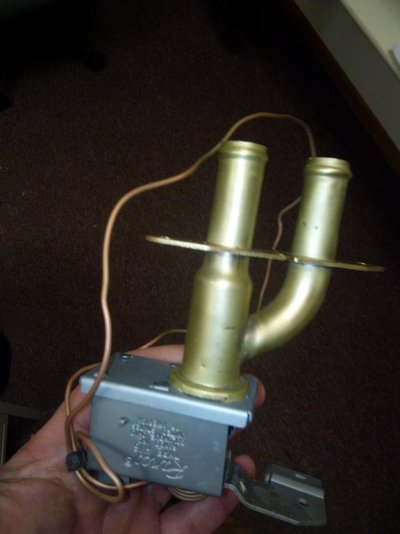
I need '66 Imperial heater Pics, please!

patrick66

Old Man with a Hat
Joined
Jul 4, 2012
Messages
6,698
Reaction score
5,349
Location
Central Oklahoma
Here is a weird thing I've seen in the past on '66 Imperials (and perhaps '64 - '65 cars, too) - Some heater cores have one inlet/one outlet, over against where the cowl and RF inner fender meet up. Others have those and two more out the bottom of the heater box, under the hood. Mine has the two, as described, with the two other holes on the bottom of the heater box under the hood plugged off with no connection to anything. I'll post what I have this evening. What say you?
 
If you have heat in the car but can't adjust to cold, the two that are plugged off are likely for a heater valve. If you don't have heat, likely the heater core is bypassed but they still have water flowing through the valve.
 
I have not hooked up the two to the coolant inlet/outlets on the 440 yet. I'm going to post a few pics up this evening. My tentative plan is to hook up the two lines I have, with an inline water shutoff valve. If I have heat all the time, then I'll be able to shut off the flow through the heater. I hope to hell the core is not plugged up or leaking. It's not like the Imperial gets much Winter driving use, but I'd love to actually have a functioning heater. The dash slide control and the push-buttons seem to function, and the fan switch works in all three speeds, so that part is good.

Apart from that, my air conditioning blows cool, but not cold. I've got the R12 to recharge things to icy cold. I just need to get with my friend who has all of the R12 kit to do it properly.
 
OK, here are your pictures. This is the ONLY way that Factory AC Imperials came: The picture on the left is from left to right- top/top/bottom/top: Hot Water Outlet from Ranco Valve to Heater Core inlet (hot water valve); Hot water INLET to H-16 RANCO VALVE (hot water valve) from water pump; Inlet from Ranco valve to Heater core; outlet from heater core to water pump. The Ranco valve is an EASY fix-no need to mickey mouse a solution. Get a new one, take out the glove box, remove the right wiper arm, disconnect the heater slide cable, then go under the hood and disconnect the hot water hoses, remove the copper wire probe that's attached to the Ranco valve and buried in the HVAC plenum, remove the two screws that hold the Ranco valve in place, remove. Reverse process to re-install. The picture on the right is where the Air Conditioning EXPANSION valve is located with high pressure inlet and low pressure return hoses.
Have fun-not a big deal.

Norm (that's a 1966 Imperial Convertible you are looking at)

1669164893261.png
1669164927691.png
 
Here is what I have on my '66. There are only the two coolant lines coming out way up at the upper left corner. There are soft plugs in the heater box that correspond to the other two lines in your picture. I wonder if this was rigged up, for whatever reason, to use just the two, versus the four; and why?

IMG_20221123_171947604.jpg


IMG_20221123_172009093.jpg


IMG_20221123_171937885.jpg
 
Those two in the upper left corner just go into the control valve. The two that are plugged off are for your heater core. I don't know why that was done but suspect that if you open that up you'd find a big empty spot where the heater core should be. Or... Potentially somebody retrofitted a different heater core and plumbed it in elsewhere. Or, maybe it's a warm weather vehicle only. But the upper two are just for the valve .
 
OK, here are your pictures. This is the ONLY way that Factory AC Imperials came: The picture on the left is from left to right- top/top/bottom/top: Hot Water Outlet from Ranco Valve to Heater Core inlet (hot water valve); Hot water INLET to H-16 RANCO VALVE (hot water valve) from water pump; Inlet from Ranco valve to Heater core; outlet from heater core to water pump. The Ranco valve is an EASY fix-no need to mickey mouse a solution. Get a new one, take out the glove box, remove the right wiper arm, disconnect the heater slide cable, then go under the hood and disconnect the hot water hoses, remove the copper wire probe that's attached to the Ranco valve and buried in the HVAC plenum, remove the two screws that hold the Ranco valve in place, remove. Reverse process to re-install. The picture on the right is where the Air Conditioning EXPANSION valve is located with high pressure inlet and low pressure return hoses.
Have fun-not a big deal.

Norm (that's a 1966 Imperial Convertible you are looking at)

View attachment 568671View attachment 568672
@watchfatha ... Are you certain the ranco is plumbed correctly? Mine is plumbed opposite side on my '64. It works like it should but I read somewhere that you'll wreck them plumbing them in backwards. I'm not certain the guy before me did it right.
 
@jimmyessbee - From under the dash and through the glovebox door (the glove box is out, for now), I can see.the heater core. The guy I bought it from told me the car was never a cold-weather car during his fathers' ownership, and said the hoses were disconnected to keep the heater core from becoming a leaker.... Which doesn't explain the lack of the other two heater orifices.
 
@jimmyessbee - From under the dash and through the glovebox door (the glove box is out, for now), I can see.the heater core. The guy I bought it from told me the car was never a cold-weather car during his fathers' ownership, and said the hoses were disconnected to keep the heater core from becoming a leaker.... Which doesn't explain the lack of the other two heater orifices.
The reason I suspected it was gone is because part of the heater core are the two ports that extend out of the box. They're not there, so the heater core is not how it ought to be if it is present.
 
Perhaps the PO replaced the core with one from a non-AC Imperial? I'll dig around under the dash and see if anything just pops out at me. I'm tempted to hook up two hoses to that upper left location and simply run water to that and see where it goes. Better yet, take compressed air at about ten pounds of pressure and shoot it through one hole and see if it exits out the other hole, and not some random spot under the dash.
 
Even in non ac cars, those upper hoses are just a valve. If it goes in, it will come out if the valve is open. It may leak inside, too, if the valve is shot. What is behind the firewall behind the upper hoses is something that looks similar to this:IMG_20221114_113549_578.jpg
 
Yes, my system is plumbed correctly: hose on the right at the Ranco valve comes from the water pump, hose on the left goes to the heater inlet. Patrick: if you do not see brass outlets at the top and bottom of the heater core housing (and it does not look like they are there) you need to open up the box ( VERY EASY) and take a look at what-if anything- is in there. If no heater core, get one and install it. NOTE: There's a plastic rivet that holds part of the heater core flange in-DON'T BREAK IT. A NON-AC heater core will not work because the plenum (housing) is different and the inlet and outlet positions are in different places, so a non-ac core will not fit. There is NOTHING under the dash that holds water. Don't bother hooking up coolant lines to the Ranco valve if there's no heater core-there's no place for it to go.

Try Bob Hoffmeister (imperial heaven) for a heater core. Very easy job, but make sure it (and the Ranco Valve) do not leak before you plumb them in to the system again.
 
@watchfatha ... Are you certain the ranco is plumbed correctly? Mine is plumbed opposite side on my '64. It works like it should but I read somewhere that you'll wreck them plumbing them in backwards. I'm not certain the guy before me did it right.
Look in the FSM and you'll see how it is connected (like mine).
 
Look in the FSM and you'll see how it is connected (like mine).
Well... I'll be darned. I did indeed check and thew water was flowing the right direction through my ranco... but it was routed first through the heater core thus the transposing of hoses on the ranco. Obviously, your way is better. Mine has since been switched. Thank you.
 
The front cover on the heat/air box can be separated without any big problem, true?
Maybe. It depends on how much goop has been put on it to seal it up over the years. It is something I avoid doing, but I don't think you can. It's obvious something is not how it ought to be and in order to actually know what you have behind it, you're going to have to open it up. The heater core, if it's there, won't work unless you can attach a coolant source to it. Just take out the bolts and go slow working your way around the periphery with a scraper or something -- something wider than a flat screwdriver. For me, anyway, when using a screwdriver the temptation is just too great to try to pry it off. It's almost 60 years old... it might be brittle. Just take your time. It's got to be about the process more than the goal at that point in order to do a good job without wrecking anything.
 
The front cover on the heat/air box can be separated without any big problem, true?
As in all things when dealing with an old car, do it carefully and slowly and you will not have a problem. First, disconnect the solenoid, the vacuum hose and the arm on the solenoid atop the plenum. Loosen the bolts all around the heater core box and slowly begin to pry it off all around. If a little prying nudge is required use a wide blade, like what you use to smooth drywall-you want to spread the force and not concentrate it in one area. Again, GENTLY. One more thing: If the vacuum hose is very stiffly attached to the outlet on the solenoid be very careful that you don't snap the solenoid nipple. In that case you can try clipping the hose a few inches away from the nipple, while leaving it attached. Try later re-connecting it via a small plastic tube-this way the hose stays put and you don't risk breaking the nipple off the solenoid. Been there, done that.
 
Back
Top