Turn Signal Repair

SPF Required

Well-Known Member
FCBO Gold Member
Joined
Jun 24, 2017
Messages
848
Reaction score
1,139
Location
California.
I got a repop turn signal canceling cam for my ‘68 300 with tilt/telescope steering column (thank you @marty mopar ).

I have never pulled a steering wheel, let alone worked on the inside of the column. I studied lots of YouTube videos, bought a steering wheel puller/compression tool, and got the courage to dig into the project today.

Made my way through all of the removal and made it to the turn signal switch. Once there, I couldn’t initially see anything wrong with the original cam. Upon closer inspection, I could see a little crack near the base of the little lob that holds the left turn signal on (which is why it wouldn’t hold for my left turns).
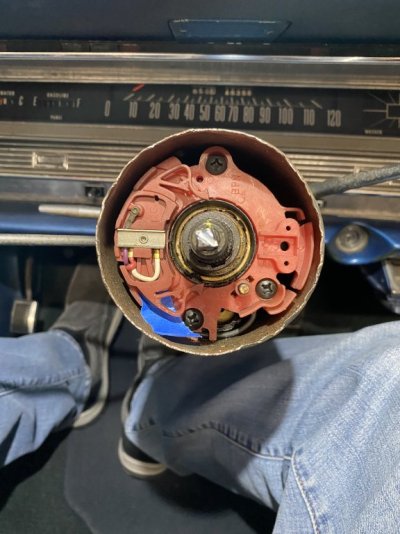
65994E38-BF19-45CE-898F-55435C365026.jpeg

3875F4B3-1FDA-43DD-852A-E1F6AF16125F.jpeg


At that point, I could not figure out how to remove the existing canceling cam (lack of confidence) so I did the next logical thing, went and got some JB Plastic weld for plastic. Let it cure, and seems to be doing the trick…. For now!
7F3F70B2-1202-449A-A19C-F6A613B38637.jpeg
 
I like the how the re-enforced corner worked out. The column can be intimidating for sure.
 
One of the reasons I fell short of pulling out the entire turn signal switch was I could not remove the TS lever. I didn’t see any pins so I assumed it would unscrew, but it wouldn’t budge. Anyone have any tips on how to get the lever off of this switch (just in case my JB Weld repair doesn’t hold).

Also…. When comparing the new cam to the one installed, I noticed the purple wire is deleted from the new cam. Anyone know what that purple wire is for, and if it is needed IF I eventually install the new cam?

Thank you!
994D40C3-CC89-4398-912A-B2A03EB35FE3.jpeg
 
I didn’t see any pins so I assumed it would unscrew, but it wouldn’t budge. Anyone have any tips on how to get the lever off of this switch (just in case my JB Weld repair doesn’t hold).
You need to put more smash on the arm to get it off! There should be 2 small cuts on the signal arm up close to the column, find the right size wrench to fit and go to town. Make sure your turning the correct way to remove it! I like how you reinforced that corner on the cam, it seems they all break right there. Good Luck
 
so I did the next logical thing, went and got some JB Plastic weld for plastic. Let it cure, and seems to be doing the trick…. For now!
Welp….. that didn’t last long. Took the car out for a cruise today. First left turn, the signal held. Next one, I had to hold it down. :mad:

Oh well…. At least I gained some skill and confidence with working on my column.
 
The purple wire is for the cornering lights - you will have to use a very small (jewelers) nut and bolt to fasten to the new cam
 
The purple wire is for the cornering lights - you will have to use a very small (jewelers) nut and bolt to fasten to the new cam
Good to know…. Thank you @MOVE N UP!

My car is not equipped with the cornering lights so I can stick with the delete.

Thank you!
 
I should have provided an update…. The TS cancelling cam repair lasted exactly one left turn. :BangHead:
 
Shame. I didnt want to get into removing that cruise handle stuff. Might try that repair nut with a plastic welder
 
I should have provided an update…. The TS cancelling cam repair lasted exactly one left turn. :BangHead:

Don't feel too bad. I had to diddle w mine 3 times B4 getting things as right as they're going to be, until I get a new cancel cam. Everything else is good though. The Big Trick is to get the upper bearing and the collar behind that loose. Then, you can easily re-fasten the switch properly to the little springs each of those 10-32 screws has to go through. Use an ACCURATE torque driver to drive those screws back down, and I advise minimal torque on those to get things right.
 
You need to put more smash on the arm to get it off! There should be 2 small cuts on the signal arm up close to the column, find the right size wrench to fit and go to town. Make sure your turning the correct way to remove it! I like how you reinforced that corner on the cam, it seems they all break right there. Good Luck
Takes a 9/32 wrench
 
Back
Top