You are using an out of date browser. It may not display this or other websites correctly.
You should upgrade or use an alternative browser.
You should upgrade or use an alternative browser.
New buy 1971 Plymouth Fury Gran Coupe
- Thread starter Jonny89
- Start date
Jonny89
Member
- Joined
- Dec 31, 2013
- Messages
- 52
- Reaction score
- 2
The only problem with the upholstry is that drivers seat. I dont know what happened. Aside from that, sombody cutting out holes in the front doors for speakers, and a small hole in the ceiling upholstry from mice. The car is in fair to good shape.
I will be bringing the car down next Wed or Thurs. First thing to get checked out will be that ball joint! Be back then!
Jon
I will be bringing the car down next Wed or Thurs. First thing to get checked out will be that ball joint! Be back then!
Jon
1970FuryConv
Old Man with a Hat
Fuel Tank Recondition
I read your thread. I have a 1970 Fury, which is basically the same car. I love the 70-71 Hidden Headlight Furies. You bought a great looking car. I noticed no response on the fuel tank question, so I thought I'd take a stab at it. These are my notes from removing a fuel tank last year from a 1970 Fury Parts car. Note: After removing the tank, take it to a shop to have it professionally cleaned out, but if they offer some $200 internal coating, reject it. It's a rip off. Cleaning out the tank should be no more than $50. As far as they fuel lines, if they look OK, I would just replace the fuel filter and let it do its job. Inline fuel filters are cheap. You can always run a clear plastic one for a few miles and look for rust particles. If present, replace it with another.
9-16-13 FuelTank
· Siphon as much gas as possible out of tank. JackCar: jack front of the car high, 6 notches on front jackstands. Jack rear at axle: 5 notches on jackstands under frame forward of axle. Car level with plenty of room to drop fuel tank
· Filler Neck: remove mtg screw, 7/16 socket, 10 ext, 3/8 BB
· Hoses: 1/4 socket, 1/4 ratchet (R) to loosen clamps at fuel hose and 2 vent hoses
· Fuel Hose: plug at tank with 5/16 thread bolt and clamp
· Fuel Line: plug with 5/16 hose, 5/16 thread bolt, and clamp
· Filler Neck: turn 90 degrees C, so mount clears hole in frame as tank moves forward when dropped
· Tank Straps: spray WD40 on front studs. 9/16 wrench to start CC until within depth of 9/16 long socket and 1/2 R.
· Jack Under tank: best to set up slightly forward of center.
· Tank Straps: finish remove 9/16 nuts on front studs
· Fuel Tank: push forward and lower to floor: not many leaks, but wish I'd assistantto hold steady.
· Fuel Tank Pad: good condition
· Fuel Tank: 3 pin sized holes at top front left.
· Trunk Floor Above Pin Holes: rotted out in 6x6 area. Cleaned out with pry bar and channel locks
· Sweeping: lots of sweeping up rust


Great, I will need much of it. I plan on doing a oil change, and will check the transmission fluid. I figure it would be a good idea to take off the fuel tank and clean it, as well as clean all fuel lines to the carb. I Don't know exactly where to start on this old heap.
Can anybody give me an idea on how to do this, I think it is time for me to buy a shop manual.
I read your thread. I have a 1970 Fury, which is basically the same car. I love the 70-71 Hidden Headlight Furies. You bought a great looking car. I noticed no response on the fuel tank question, so I thought I'd take a stab at it. These are my notes from removing a fuel tank last year from a 1970 Fury Parts car. Note: After removing the tank, take it to a shop to have it professionally cleaned out, but if they offer some $200 internal coating, reject it. It's a rip off. Cleaning out the tank should be no more than $50. As far as they fuel lines, if they look OK, I would just replace the fuel filter and let it do its job. Inline fuel filters are cheap. You can always run a clear plastic one for a few miles and look for rust particles. If present, replace it with another.
9-16-13 FuelTank
· Siphon as much gas as possible out of tank. JackCar: jack front of the car high, 6 notches on front jackstands. Jack rear at axle: 5 notches on jackstands under frame forward of axle. Car level with plenty of room to drop fuel tank
· Filler Neck: remove mtg screw, 7/16 socket, 10 ext, 3/8 BB
· Hoses: 1/4 socket, 1/4 ratchet (R) to loosen clamps at fuel hose and 2 vent hoses
· Fuel Hose: plug at tank with 5/16 thread bolt and clamp
· Fuel Line: plug with 5/16 hose, 5/16 thread bolt, and clamp
· Filler Neck: turn 90 degrees C, so mount clears hole in frame as tank moves forward when dropped
· Tank Straps: spray WD40 on front studs. 9/16 wrench to start CC until within depth of 9/16 long socket and 1/2 R.
· Jack Under tank: best to set up slightly forward of center.
· Tank Straps: finish remove 9/16 nuts on front studs
· Fuel Tank: push forward and lower to floor: not many leaks, but wish I'd assistantto hold steady.
· Fuel Tank Pad: good condition
· Fuel Tank: 3 pin sized holes at top front left.
· Trunk Floor Above Pin Holes: rotted out in 6x6 area. Cleaned out with pry bar and channel locks
· Sweeping: lots of sweeping up rust
Last edited:
Jonny89
Member
- Joined
- Dec 31, 2013
- Messages
- 52
- Reaction score
- 2
Thanks for the tips and checklist. I will use them.
Update on the car- Been too busy with work at the railroad. I have already arranged transportation to get the Fury down to the house this Tuesday or Wednesday (My off days). First thing will be to look at that passenger side ball joints. I have printed off most of the chassis factory manual, it will come in handy!
Thanks
Jon
I'd just go with a new tank on these old cars.
heres a good one, just make sure you get one with the correct vents http://www.ebay.com/itm/67-73-Mopar...971|Model:Fury+II&hash=item5ae2976268&vxp=mtr
We've installed one of those in our '70 Newport convertible 2 years ago just before Carlisle. Excellent quality and fit was great!
Yes we fixed the tailpipes while it was on the lift to make them come out centered. Also weld nice tips on the pipes too ccasion14:


heres a good one, just make sure you get one with the correct vents http://www.ebay.com/itm/67-73-Mopar...971|Model:Fury+II&hash=item5ae2976268&vxp=mtr
We've installed one of those in our '70 Newport convertible 2 years ago just before Carlisle. Excellent quality and fit was great!
Yes we fixed the tailpipes while it was on the lift to make them come out centered. Also weld nice tips on the pipes too


1970FuryConv
Old Man with a Hat
Replacement Upper Control Arms


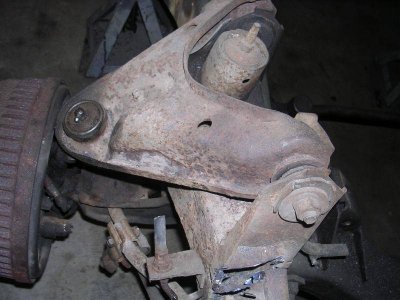
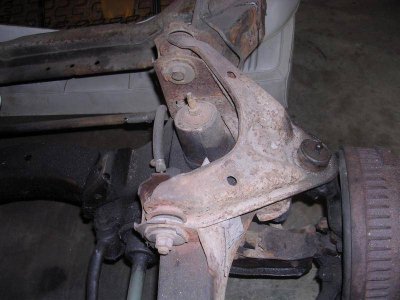
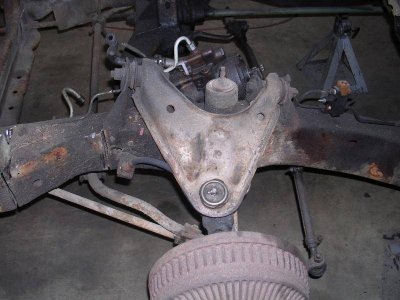
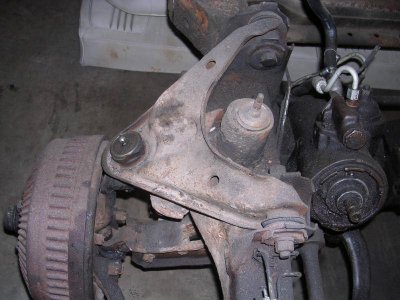
These are from a 1970 Plymouth Fury. I actually drove it for a year before deciding to part it. No handling problems. They are an exact fit for your car. $50 plus ship for the pair if you want them. Note the passenger side pictures don't have a steering gear beside the upper control arms. PM me if you still need a set.


These are from a 1970 Plymouth Fury. I actually drove it for a year before deciding to part it. No handling problems. They are an exact fit for your car. $50 plus ship for the pair if you want them. Note the passenger side pictures don't have a steering gear beside the upper control arms. PM me if you still need a set.
Interesting lift. Never seen one like this. How is it called?
70NPORT
Old Man with a Hat
Boy that stand looks very precarious (the one under the car). That is a lot of weight up there in the air.I'd just go with a new tank on these old cars.
heres a good one, just make sure you get one with the correct vents http://www.ebay.com/itm/67-73-Mopar...971|Model:Fury+II&hash=item5ae2976268&vxp=mtr
We've installed one of those in our '70 Newport convertible 2 years ago just before Carlisle. Excellent quality and fit was great!
Yes we fixed the tailpipes while it was on the lift to make them come out centered. Also weld nice tips on the pipes tooccasion14:

Jonny89
Member
- Joined
- Dec 31, 2013
- Messages
- 52
- Reaction score
- 2
Sweet, I will look into the upper control arms 70FuryConv. Thanks for the offer, let me look at mine before I decide. I might have to go with a new gas tank. Is there a good product out their that you can put into the fuel tank to clean the Carb jets. I heard of Sea Foam? Any ideas?
Update on the Fury: Last Tuesday my Uncle and I arrived at the garage where the fury has been resting for the last 11 months. I still can't get the car to start in park, only neutral. My Uncle's trailer fit a 1955 International Dump Truck on it several weeks ago for transport, big trailer. The Fury was too big for the trailer! I didnt realize the car was wider than 6.5 ft from bumper to bumper. I now have to try and get a flatbed for transport. This Tuesday or Wednesday, she should be down at my house.
My friend with the ford's has a hydralic jack like the one pictured above. Let's just say I would'nt feel too comfortable working under that car with just that jack for support.
Jon
Jonny89
Member
- Joined
- Dec 31, 2013
- Messages
- 52
- Reaction score
- 2
Thank you all for the help and support!
Its a SnapOn dual piston scissor lift rated for 3-3.5 tons

:laughing4: :laughing4: :laughing4:

:laughing4: :laughing4: :laughing4:
polara71
Old Man with a Hat
Not a prayer , would I be under that
CanCritter
Senior Member
Not a prayer , would I be under that
x2
I love showing that picture to people and hearing their reactions haha. I was changing the starter in that picture. As long as you take precaution and use common senses its going nowhere. The pump doesn't even struggle to lift it up!
polara71
Old Man with a Hat
What holds it up? Isn't it the same thing as working under a jack with no stands?
70NPORT
Old Man with a Hat
You obviously have cast iron balls.
patrick66
Old Man with a Hat
They use three of these lifts in my son's auto vo-tech class. They are really great lifts, and amazingly steady. I've been tossing around getting on for my shop. These also work well in a normal attached garage.
polara71
Old Man with a Hat
I bet I can knock it over
commando1
Old Man with a Hat
Yes. Haha. It's not going nowhere until it does. Then it's called an accident.I love showing that picture to people and hearing their reactions haha. I was changing the starter in that picture. As long as you take precaution and use common senses its going nowhere. The pump doesn't even struggle to lift it up!
Posted via Topify on Android
CanCritter
Senior Member
better hope the lock and rubber o ring holding it all up aren't made in china...bottom line that setup is a accident waitin to happen...
Similar threads
- Replies
- 7
- Views
- 3K
- Replies
- 15
- Views
- 2K


