DasBoot
Member
Hi folks,
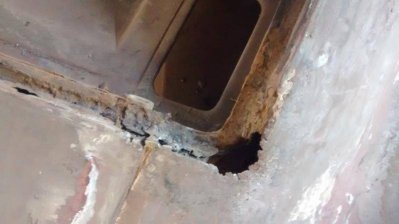
Since the internet is littered with posts on how to repair window channel rust ranging in cost from cheap to professional, figured I'd help the board out and illustrate how I'm doing mine. This is on my 71 New Yorker. Its pretty evident why the trunk was getting water into it after a hard rain (I also have several Dusters that do the exact same thing). I welcome any constructive criticism or tips on doing this from anyone on this board, please provide feedback! Sorry for the large pix, but I wanted to show as much detail as possible.
Keep in mind this is a budget repair with the tools I have on hand, but also from the viewpoint that I don't want any further damage to the car for future generations. I realize that's almost an oxymoronic statement, but I don't have the funding to pay a shop to fab a channel from scratch.
I first figured out what I needed to cut. Since there are two layers of metal that make up the small strip sections where the window rests and by the grace of god, mine were only rusted thru to the first layer, I decided to just remove the first layer and replace it with good steel.


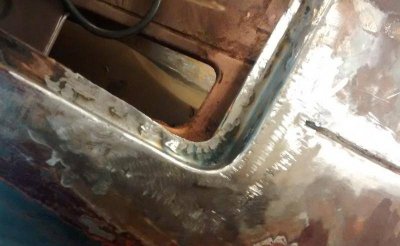
You can see the patch panels on the package tray I've cut out and plan to weld into the repair in the above photo. I used the chrome trim as a guide for making the patch piece that the window rests on. Its the same shape and swoop as the channel itself. Pretty handy so far.
I used an air chisel to remove the first layer of rusted channel (along with an air cutoff wheel from Harbor Junk for the sides). After removing the entire trunk and tail light panel on my sons duster and learning how the air chisel works on dual layer sheetmetal joints, I was able to chisel gracefully so as not to disturb the bottom layer of factory metal (which is what I'll be welding to).
I'll post some more pix as soon as they're uploaded.
Since the internet is littered with posts on how to repair window channel rust ranging in cost from cheap to professional, figured I'd help the board out and illustrate how I'm doing mine. This is on my 71 New Yorker. Its pretty evident why the trunk was getting water into it after a hard rain (I also have several Dusters that do the exact same thing). I welcome any constructive criticism or tips on doing this from anyone on this board, please provide feedback! Sorry for the large pix, but I wanted to show as much detail as possible.
Keep in mind this is a budget repair with the tools I have on hand, but also from the viewpoint that I don't want any further damage to the car for future generations. I realize that's almost an oxymoronic statement, but I don't have the funding to pay a shop to fab a channel from scratch.
I first figured out what I needed to cut. Since there are two layers of metal that make up the small strip sections where the window rests and by the grace of god, mine were only rusted thru to the first layer, I decided to just remove the first layer and replace it with good steel.


You can see the patch panels on the package tray I've cut out and plan to weld into the repair in the above photo. I used the chrome trim as a guide for making the patch piece that the window rests on. Its the same shape and swoop as the channel itself. Pretty handy so far.
I used an air chisel to remove the first layer of rusted channel (along with an air cutoff wheel from Harbor Junk for the sides). After removing the entire trunk and tail light panel on my sons duster and learning how the air chisel works on dual layer sheetmetal joints, I was able to chisel gracefully so as not to disturb the bottom layer of factory metal (which is what I'll be welding to).
I'll post some more pix as soon as they're uploaded.


