1969 Imperial Lebaron Resto-Rod Project

Did I hear you say prototype Miller welder?

Posted via Topify on Android
I have the welder that that one gave birth to and I love it although I find I don't use the "auto set" feature as I did when I first got it. It has infinite settings in addition to the "auto set". It's one hell of a machine that plugs into a 110 volt outlet!
 
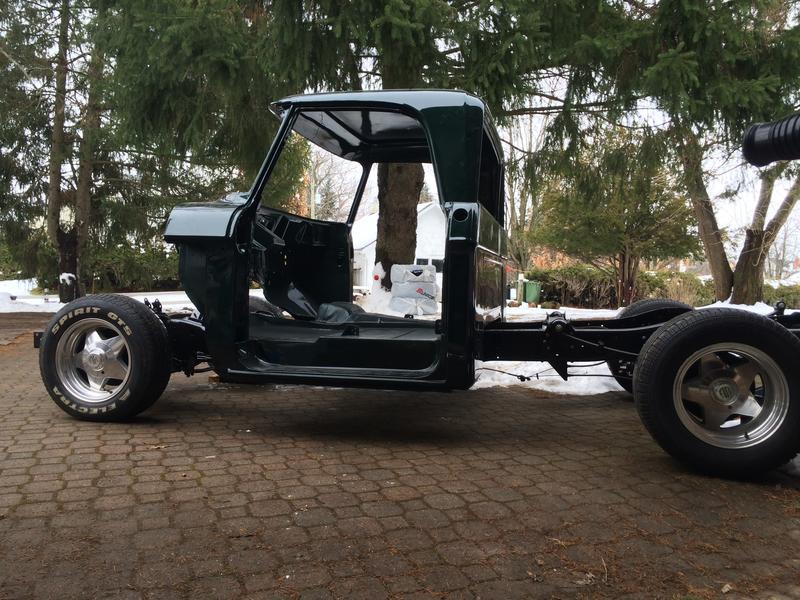
Damn man that's looking clean! I followed Mattrods thread and was inspired by it, but I didn't want to do all that work or even pay somebody to do it! There had to be a better or more practical way. Up front, the shock tower was removed and replaced with a 8" hydraulic cylinder. It fits right in there and bolted right to the LCA( I had a professional shop do it). All of the bump stops were removed and any other item that would keep me from laying crossmember. The rear, Im still running 2 leaf springs and 3" blocks. The hydros were mounted to the side of the frame and down to the axle. I may have it rebuilt with a bridge connecting the two frame rails and having the cylinders mounted there and down to the axle. I have 4 batteries, 2 pumps and 4 accumulators for the smooth ride. They do not disappoint. It's not a hopper or a hot rod race car. It's strictly for laying out and just being low. I don't get crazy with the switches because these are uni-bodied cars and you don't want to start twisting things up! If you're looking to put power to the pavement, I'd definitely look into a 4-link set up to take any of the torque off of the hydros.

Yeah getting all that work paid for would be insane .... I really wish he finished that car; madness fab skills!!

Couple questions for ya 440Sled:
front
1) so your torsion bars are hooked up still? just turned basically all the way down? are the torsion bar bolts dangerously close to scraping the ground?
2) how are your ball joints? any binding issues or are you not close to that range yet layin cross member?
3) have you found any need for shocks? or are the accumulators doing their job? did they actually break in and soften up a bit or is that all BS?

back
1) did you have to notch the crossmember where the original shocks were mounted for the pumpkin to tuck up?
2) If you didnt tunnel the floor how much would the drive shaft stop you from layin out?


It's been fun! Going on 3 years now with no issues. I charge the batteries about every 3 months or so. Your car is 100x's nicer than mine, plus your looking burn some rubber. Some reinforcements would definitely be needed!

I'm "Chris68" on the Los Boulevardos forum.

Thank you very much!!

and yeah I was on LB and recognized your car! ... tried to go through the build thread you got on there with the suspension .... but I cant view the pics since I'm not registered ... ANNNND I they are not taking registration any longer ..... so ****. (But its all good I found the info I needed .... I was just interested!!)

I have the welder that that one gave birth to and I love it although I find I don't use the "auto set" feature as I did when I first got it. It has infinite settings in addition to the "auto set". It's one hell of a machine that plugs into a 110 volt outlet!


yeah that 110V is beautiful!!! go anywhere with it!!!


--------------------

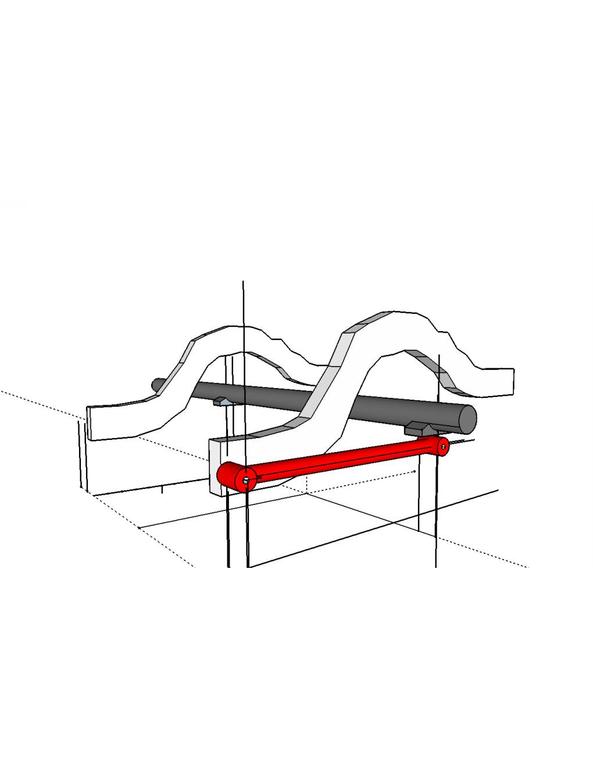
So with all this suspension talk I dove into 4 link set ups .... Annnnnnd theres no kits for C-bodies (as is tradition ... not surprised at all)

so I dove into custom design .... which doesn't look to hard. I'll take advantage of the Front spring mount and go from there with the top mount.

I found this crazy calculator for a base line at least! this guy put in some serious work!

http://www.pirate4x4.com/forum/gene...-version-my-4-link-analyzer-request-help.html

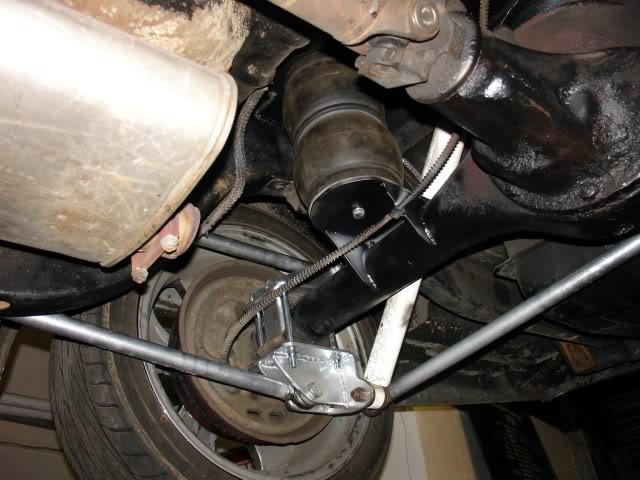
The only similar car was this '67 fury from New Zealand with a decent 4 link set up and bagged at the back (No compressor or anything ... just bags as the springs)

I think it may be the right route to go ... then if I want to go any further with the suspension I can always just upgrade this setup (for juice or whatnot)

THUVGKJ.jpg


If anyone has a link to a build with bar lengths etc .... let me know!!

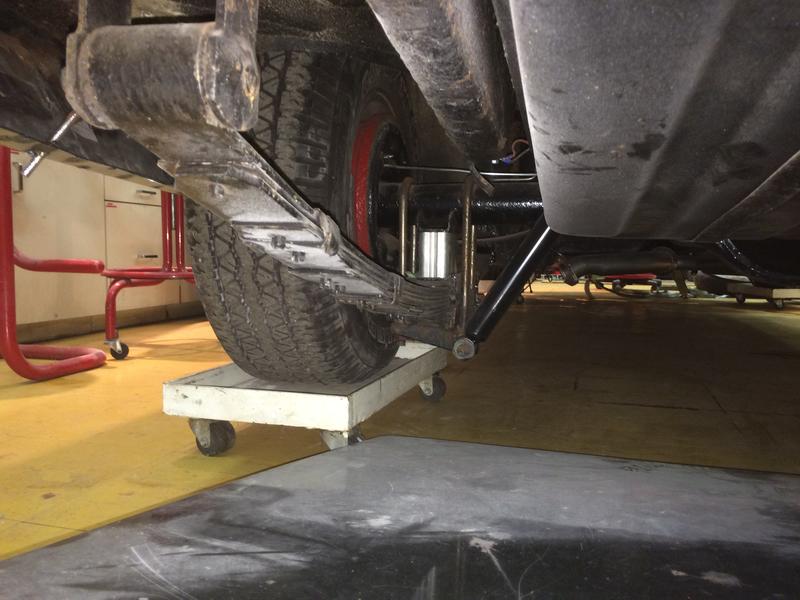
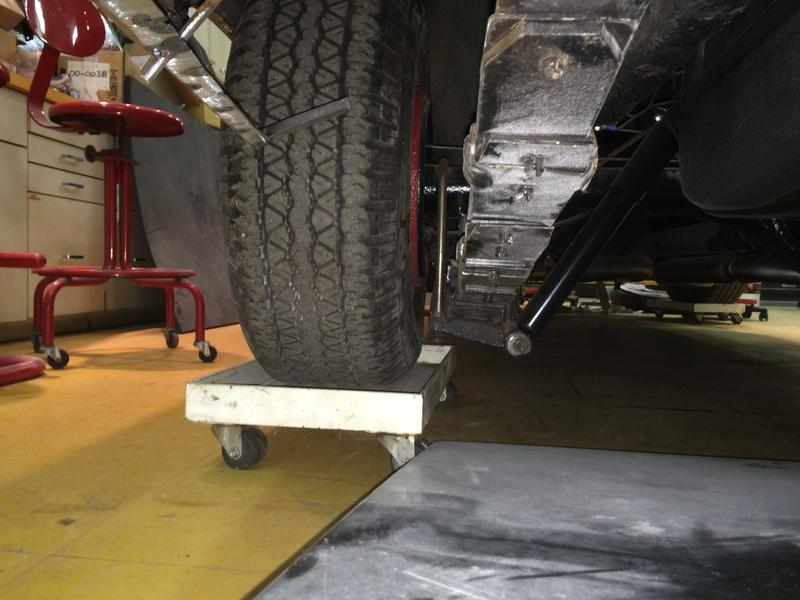
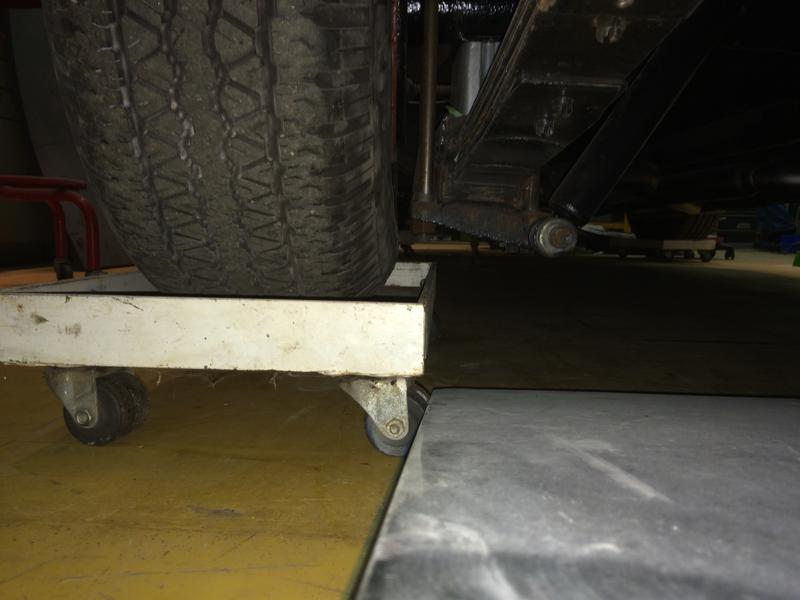
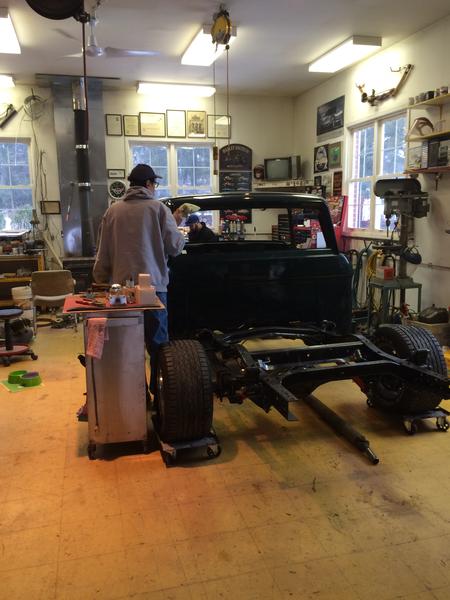
Because this is what my U-bolts etc look like right now .... pretty damn close to bottoming out .... and I just rebuilt my driveshaft (sweet jesus I had no idea what I was getting into ... the ******* thing has 4 U-Joints .... and they were stuck in there so damn hard .... I bent my hydraulic press trying to get them out) So I'm really not keen on doing it again if I get to much axle wrap.....

6tKmhfr.jpg


see how close those bolts are to the wheel dolly? nervous.

qY4SQ07.jpg


ZHMuymz.jpg


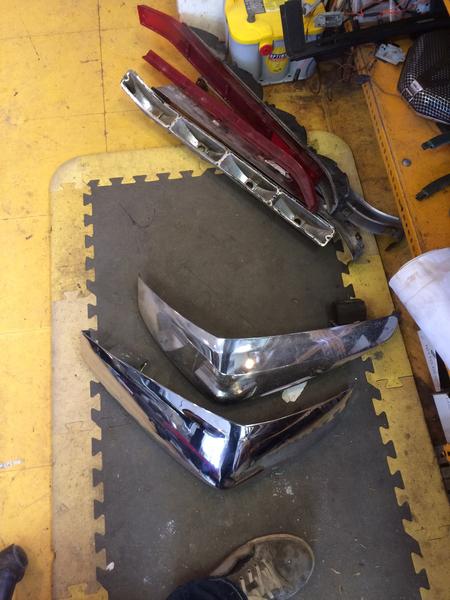
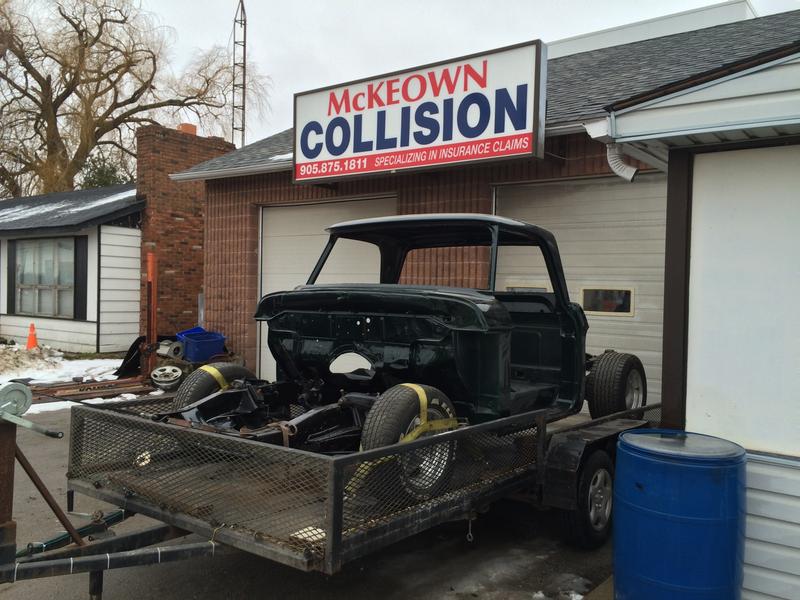
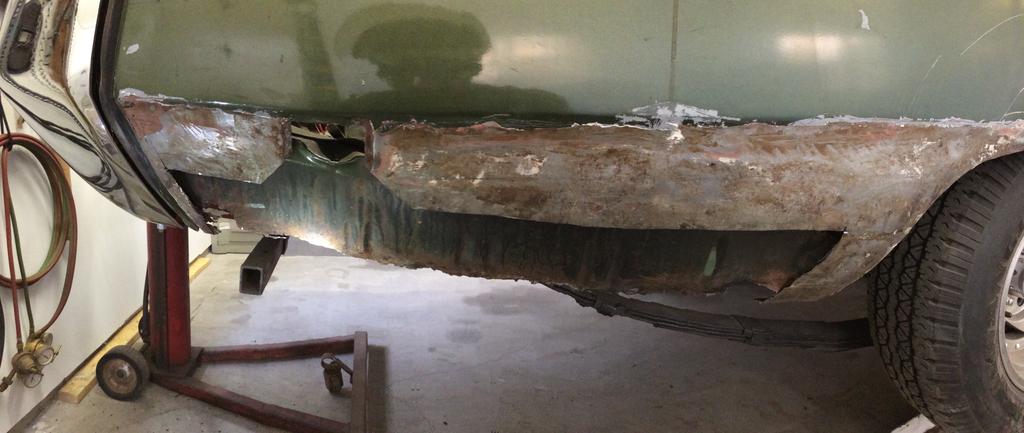
Got into the rear bumper this weekend .... Still need one side bumperette rechrome .... going out next week prob. I have near perfect lenses and trim peices for the bumper which is nice!!

CgTuNvn.jpg


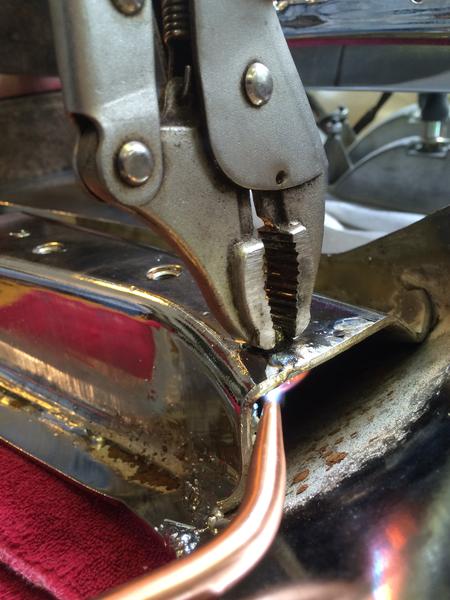
Had to start off with removing some broken bolts ....
aIWqVYY.jpg


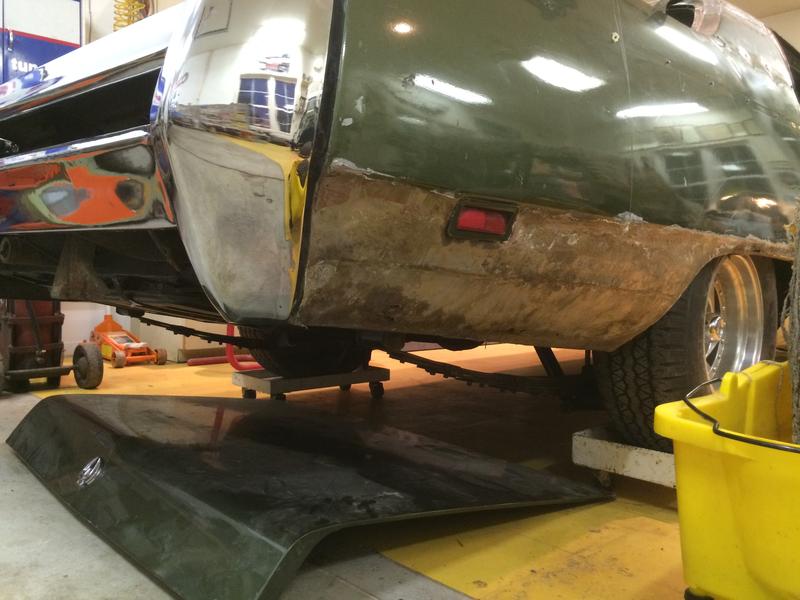
Then I got it on the car and realized I have made a brutal mistake ... the bottom line of the quarter panel was never right and is sitting about a half inch lower that where it should come to on the bumper .... should have / could have / would have mounted the bumper in the right spot before I started ..... now I have to rework that panel ... fuckin' pissed me right off ....

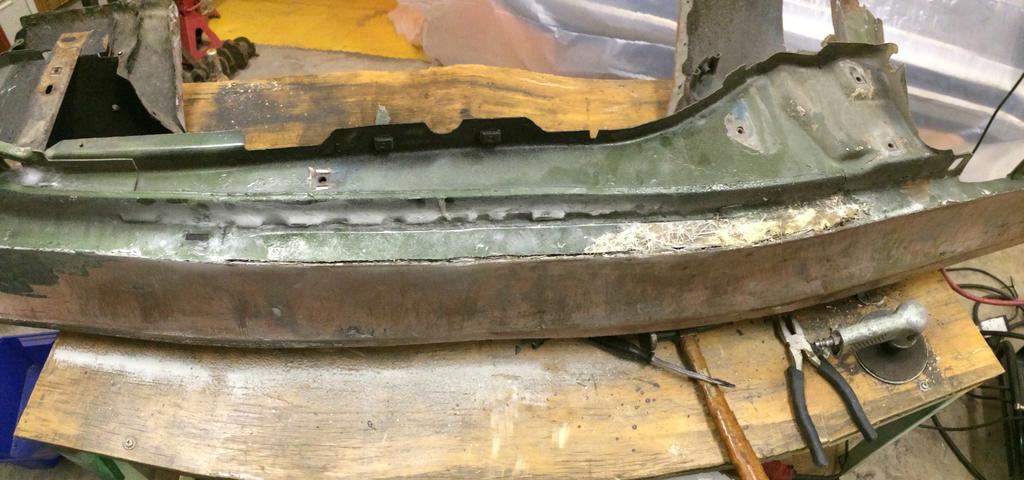
This is about where it should come too

xAZd20k.jpg


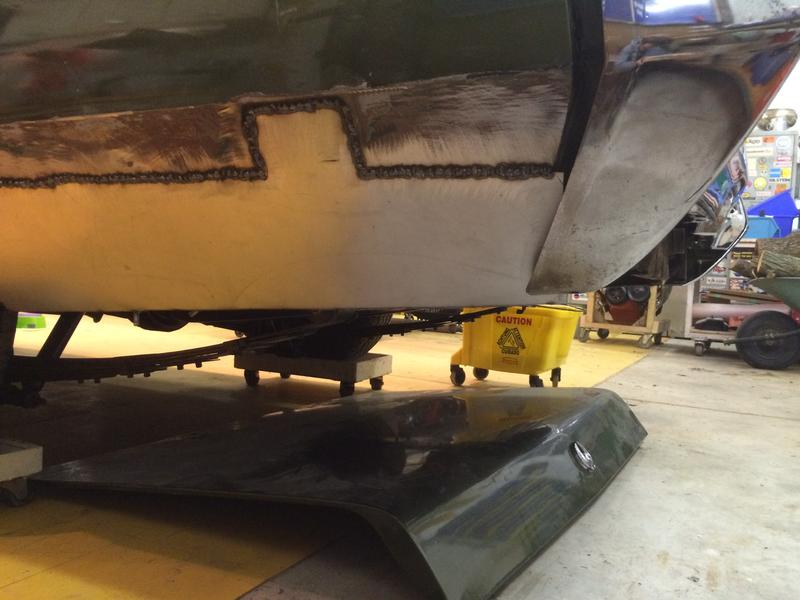
this is the side I already finished .... :(


ps0wLL3.jpg
 
Also! My dad has been building a 1965 dodge D100 step side! the cab is back on the frame! This thing is gonna be sooooooo sweet when its done!

-Chrysler 300 torsion bar front end welded in (instead of the horse cart leaf springs in the front)
-back end is lowered by de stressing the springs and flipping the mounts / moving them up.
Overall its lowered about 7"-8"

The engine is a 1952 331 Hemi with a transmission out of a modern dodge truck (I forget which one it is .... has a single button overdrive)

Some hot AR wheels.

The colour is a 2015 GMC sierra green .... it looks soooooo good!

Ckt73lQ.jpg


mcdRfJZ.jpg


Back in the shop!

0vqHz2B.jpg
 
Damn dude those shock mounts in the rear are crazy low! Super dangerous! I know you want to bag it, but for now lose the 4" blocks, go with something smaller and pull a few leaf springs to get it lower. Add some airshocks if it's too low. It worked for me for many years.
THE REAR.....The torsion bars are still in their stock locations and the bolts have been removed so I can get the full turning radius needed. My ball joints seem fine. No play or knocking, just the boots need replacing. They've been shot well before the hydros. The accumulators are ******* sick bro....no shocks needed. I was nervous when I first picked up the car because it did ride like ****. After a few hundred miles they loosened up and ride better than bagged rides! If you rode in my car, you would ever know it was on switches if I hid the switch box.
THE BACK.....No I didn't notch the rear cross member, because the shock mounts on my car are located behind the pumpkin and it all clears when lowered. I actually still have the airshocks mounted in the stock locations. Raising the tunnel dropped the car down considerably, over 2"s of travel which was awesome when I first did it. I was running the airshocks still and bottomed out all the time. ******* annoying right? I pulled more springs, let some air out and I was one happy dude. Very low and only ran like that for shows.I had my exhaust done right and now my axle just sits on the frame. So the drive shaft and pumpkin bottoming out definitely stopped me from achieving the "ultra-low" look I was striving for. Raising all of that was the best thing I ever did during my build up to bags or juice.
 
Raising the tunnel......It was quite the task with my limited skills in metal fab. It works though!

IMAG0323.jpg


IMAG0324.jpg


IMAG0334.jpg


IMAG0335.jpg


384518_3025730759781_1158127933_3349572_454395894_n.jpg


391164_3025732999837_1158127933_3349573_2082645593_n.jpg
 
Damn dude those shock mounts in the rear are crazy low! Super dangerous! I know you want to bag it, but for now lose the 4" blocks, go with something smaller and pull a few leaf springs to get it lower. Add some airshocks if it's too low. It worked for me for many years.

X2 on this!!!^^^ If you blow a tire on the rear of this car, you are going to have MAJOR problems as your shock mounts dig into the pavement at 70 mph. This is what is called the "scrub line", where the bottom of the WHEEL should be the very bottom of anything under the car. Your shock mounts are well below that level! In order to have a wheel where that scrub line is acceptable and safe, you'd need to run 20" wheels, seeing what you have set up. Ditch the spacers!!! Or, at least go with a 1-1/2" lowering block, or 2" max, if you are retaining that same-size wheel. What you have going on is EXTREMELY unsafe!!!
 
Raising the tunnel......It was quite the task with my limited skills in metal fab. It works though!

**** man .... had I known I'd be going this deep with this build I would have done this preemptively!

Oh well .... If I go the hyrdo route this will be a winter project. right now I gota get this this on the road.

Nice work Sled!! Love that car.

One of the more interesting threads ever posted here.
Good work.

Nice work and great updates Luke

I agree. Keep the updates coming, I can't wait to see this one when it's done.

Thank you very much guys! Means a lot and keeps me motivated (to post the build and Do the Work also!)

X2 on this!!!^^^ If you blow a tire on the rear of this car, you are going to have MAJOR problems as your shock mounts dig into the pavement at 70 mph. This is what is called the "scrub line", where the bottom of the WHEEL should be the very bottom of anything under the car. Your shock mounts are well below that level! In order to have a wheel where that scrub line is acceptable and safe, you'd need to run 20" wheels, seeing what you have set up. Ditch the spacers!!! Or, at least go with a 1-1/2" lowering block, or 2" max, if you are retaining that same-size wheel. What you have going on is EXTREMELY unsafe!!!

YUUUUUPPPPPP. Got a friend to come over who's built a few mopars and dragsters and we talked about the rear especially .... somethings gota be done.

Spent quite a bit of time under the car measuring everything up ....

so hears a sneak peak I've been working on today! doing some modeling (far from finished)

G0el9W1.jpg


Can you guess whats coming?!?!


also i had some decent time to get some work done over christmas there .... passenger quarter panel and door are welded in (correctly this time!) ... still gota do the wheel well though ... and redo the drivers side to get it right


Stay tuned!

Merry Chistmas!!!
 
The lower link should the same leghth as front segment of leaf spring the upper link I would use a triangulated piece so the floor does not have to be modified so much.
 
The lower link should the same leghth as front segment of leaf spring the upper link I would use a triangulated piece so the floor does not have to be modified so much.

Yeah ... that red in the picture is the lower link; its goes to the front spring mount. (Lots left to do on the design ... upper links .. panhard bar and the bag mounts)

Parallel links with a panhard will actually work better than a triangulated set up. the "floor" (inner fenders) on the outside of the frame rails provide more room for the links than the inside (there's some braces and all the other **** under there) ... I'll be able to do the set up without having to mod the floor!

I've been killing the body work lately though!!!!! although I thought I took more pictures ... I'll have to snap more! (I was to busy grinding and welding hahaha)

This is the "quarantine" area that I set up since my pops is also working in the shop on his truck and I would have covered everything with the grinding and garbage I was producing (doesnt do **** for the noise though ahahhahahahahaha)

FBxItiV.jpg


Heres the damage I managed to do on the passenger quarter panel

ptGVZSI.jpg


Inner part welded in

YZOU91c.jpg


I forgot to take pics of the quarter welded on ..... but it turned out really nice.... learned a lot from doing the other side incorrectly. I still need to do the wheel well and above the rear wheel.


But I decided to turn my attention to the front fenders .... again I didnt take to many pictures ... but I am done the passenger fender and I'm onto the drivers side ... lots of bullshit fiber glass patches and whatnot. this is the stuff I gota cut out and replace with new sheet metal.

4fkxShp.jpg


You can see in that picture in the top right theres a large amount of missing steel at the bottom rear of the fenders .... basically they did the BS repair with the glass and never left drainage holes ... so it just rotted again above the repair. Luckily the area around the shark lights on both fenders is still proper steel so I dont need to do any super finicky work


Sorry about the weak amount of pictures on this post ... I was in Go mode while doing all this!

Stay Tuned.

SS
 
Back
Top