What year is that?It's a real pisser. The car spent most of its life in a barn in the desert and had almost no rust. Four or five years ago, someone bought it and brought it to SW Washington and left it outside. It was tarped for a while, but the tarp and roof were in fragments when I bought it. Now I get to repair the 4-5 years of neglect. But it is actually a huge leap forward compared to the car I sold in order to buy it. That one had no floor or rockers and no engine or transmission and was missing its rare rear window. It was a super-rare and cool car though!
View attachment 106772
You are using an out of date browser. It may not display this or other websites correctly.
You should upgrade or use an alternative browser.
You should upgrade or use an alternative browser.
Convertible Fury - 1970
- Thread starter Jeff
- Start date
1946What year is that?
commando1
Old Man with a Hat
So, what's his punishment?My son left the garage door open yesterday during a snowstorm and snow got all over my Fury.What a numbskull!
Were it me, he would have to refer to Critter's latest project and do his best to emulate the pride and workmanship... should be worth at least a little rust removal...So, what's his punishment?
commando1
Old Man with a Hat
I was more along the lines of removing all that snow with a teaspoon.
That's a good one, except for our snowstorms are pretty weak and it wouldn't have taken very long. It was windy and the snow was dry so it got all over the place but wasn't voluminous.I was more along the lines of removing all that snow with a teaspoon.
What do you make of the picture that shows that the bracket was originally welded in the wrong place? Is that a factory mistake, or was it a mod they did for convertibles?
A couple of the hangers that the rear seat clips onto are bent. Should they be straight up and down?
the hooks and brackets should be straight up and down.
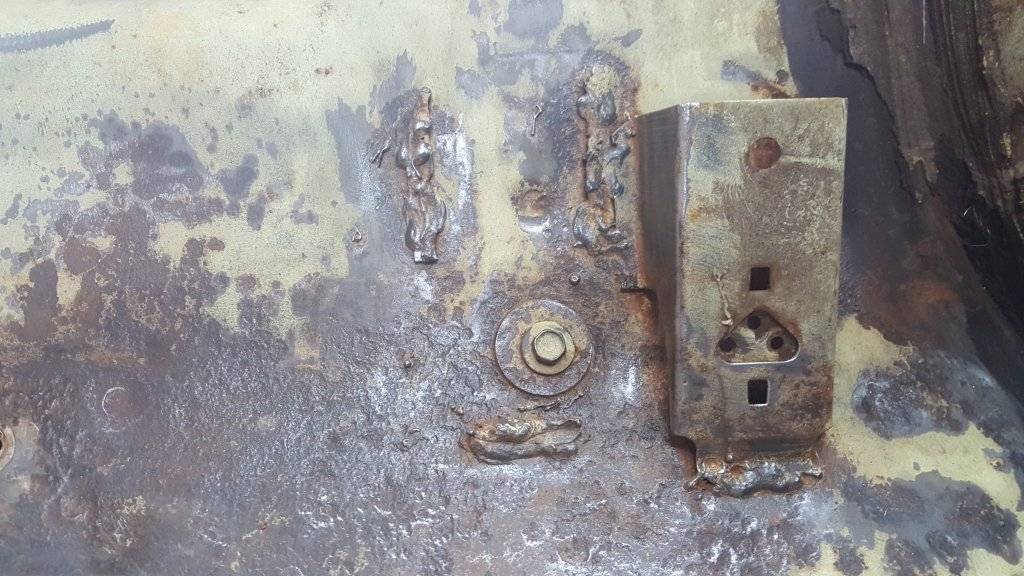
this should be a little higher (about where the other welds are) and just to the right of the bolt. if you seat fits ok, go with it. no one will know.
this should be a little higher (about where the other welds are) and just to the right of the bolt. if you seat fits ok, go with it. no one will know.
commando1
Old Man with a Hat
Manufacturing tolerances were a little loose back then...
A couple of the hangers that the rear seat clips onto are bent. Should they be straight up and down?
The clips on the floor look right to me.
Samplingman
Old Man with a Hat
I have a similar situation with my project. I experimented with a patch of fiberglass matt and POR 15. First grind the surface to remove the loose material. Coat with POR, wait until it is just tacky, then lay a piece of the matt down. It is important that you use the woven matt not the stuff that looks like a hair ball. Then, re-coat with POR. I used a shop light under the car at night to see the pin holes, then circled them with yellow chalk. The ones treated with POR sealed up perfectly. I tested holes up to half inch, then treated the underside with POR and undercoated. Strong enough to stand on and stamp my foot, which it more then anyone will be doing sitting in the car.Did you get the final color in a spray can or did you brush it on? I did a test section with spray, but I think I am going to brush the rest. Yeah, I'm the same way. I want it painted in body color even though I will never see it again.
I need to figure out what to do with pinholes. I thought I only had two holes when I first scraped off the rust, but I really have about 20 on this half of the car. I know the correct way is to MIG weld them, but that is not in the cards because of the cost. I want to do something that will prevent further deterioration and not make it harder for the next guy. I think fiberglass patches make it harder for the next guy and probably invite corrosion. Maybe JB weld or seam sealer? Most holes are a couple of millimeters wide, but there are a couple narrow slits about an inch long.
Speaking of seem sealer, a lot of mine was degraded and came right out, but there are patches that are intact, such as over the transmission hump. The problem is that it seems to be an oil-based substance, and I think it might affect paint adhesion at the boundaries. I'm thinking about removing all of it on the hump, but there will still be transitions in other areas.
That sounds like a good way to go. I ended up using All Metal epoxy filler for the small holes. I have not done anything to the underside yet, but realize that I probably should.I have a similar situation with my project. I experimented with a patch of fiberglass matt and POR 15. First grind the surface to remove the loose material. Coat with POR, wait until it is just tacky, then lay a piece of the matt down. It is important that you use the woven matt not the stuff that looks like a hair ball. Then, re-coat with POR. I used a shop light under the car at night to see the pin holes, then circled them with yellow chalk. The ones treated with POR sealed up perfectly. I tested holes up to half inch, then treated the underside with POR and undercoated. Strong enough to stand on and stamp my foot, which it more then anyone will be doing sitting in the car.
it's been cut off and welded more than once. it was originally spot welded. looks like some one had it welded over the bolt, cut it off and re-welded it to the position it is in now.Manufacturing tolerances were a little loose back then...
not the best pictures, but here is mine.


Still slowly plugging away on the floor. All the pinholes are filled in the passenger compartment and it is in primer. I was going to save the trunk for later, but the work is so messy I decided to deal with it before putting new carpet and the interior back in. I am also taking out a lot more of the seam sealer than I originally planned. There are two very distinct types of sealer. The bulk of it is a yellow looking material that is pretty inflexible. There is less of a black material, which seems to have been shaped by hand and then placed in various spots. I tested my paint for lead and had the coating on the inside of the rear panels tested for asbestos. PM me if you are interested in the results. Question: See the grayish color on the back of the wheel well and rear part of the trunk floor? Is that overspray from coating the rear panels? It looks like they probably sprayed the inside of one rear panel and then moved the spray gun to the other side while it was still spraying.


It sounds like Trim Parts is a consensus favorite for getting carpet. I'm happily surprised it is less than $200. My car had loop carpet. Does anyone know if it was 80/20 Raylong or 100 percent Nylon? You have to specify when you make the order. Also, I doubt the carpet comes with instructions and they don't pre-cut holes. Any recommendations for a how-to video or thread? Thx.
Sorry not a PM... lead I definitely expect. The car was built before it was banned. Asbestos was still used for brakes... dust could travel anywhere, did you find any in the insulation?I tested my paint for lead and had the coating on the inside of the rear panels tested for asbestos. PM me if you are interested in the results.
View attachment 113158 View attachment 113159
70Tom
Senior Member
I'm pretty sure you want 80/20 loop.It sounds like Trim Parts is a consensus favorite for getting carpet. I'm happily surprised it is less than $200. My car had loop carpet. Does anyone know if it was 80/20 Raylong or 100 percent Nylon? You have to specify when you make the order. Also, I doubt the carpet comes with instructions and they don't pre-cut holes. Any recommendations for a how-to video or thread? Thx.
Did you keep your original carpet? I kept mine so I can not necessarily use it as a pattern template, but see where they made cuts etc. It's not hard to install. You just have to measure 10 times and cut once. Also, lay the carpet out in the sun before installation. It makes it easier to lay down that way.
Thanks Tom. I kept a few samples but threw most of it away. It was nasty and came out in pieces. It had to go! I did take plenty of pics though. The part that looks the most difficult is where it goes over the plastic seat belt covers on the sides. As for sun, I can't wait until July 5th!
70Tom
Senior Member
Yes, I think that's going to be the hardest section to get right too. I still haven't cleaned up my plastic covers yet (add to the list). I think the best bet with those will be to put the covers over the belts and then lay the carpet on top of that and cut and glue the carpet accordingly.Thanks Tom. I kept a few samples but threw most of it away. It was nasty and came out in pieces. It had to go! I did take plenty of pics though. The part that looks the most difficult is where it goes over the plastic seat belt covers on the sides. As for sun, I can't wait until July 5th!
If no sun, maybe get a heat lamp then.
Similar threads
- Replies
- 3
- Views
- 149
- Replies
- 3
- Views
- 403
- Replies
- 0
- Views
- 136


