Power Window Relays, now with Power Vents

Big_John

Illegitimi non carborundum
FCBO Gold Member
Joined
May 21, 2013
Messages
20,411
Reaction score
30,081
Location
Marcellus, NY
I've wanted to do this mod for some time now. Very simply, the idea is to use a relay to raise/lower the window. This would limit the amount of electrical current flowing through the OE switches. Hopefully, the window will work better and the switches will last a lot longer. Good used window switches have gotten harder to find and expensive to buy.

I've seen aftermarket relay harnesses selling for $300... That's great I guess... If you want to spend that much money. I'm too cheap and there's no reason to spend that much.

First is coming up with a wiring diagram. It's a fairly simple circuit and I'm going to use one relay to raise and one relay to lower. I wanted it to be plug and play for the most part, or at least be able to unplug the relays and go back to the switches if a relay fails.

Window%20relay%20rev.2_zps3yvwpuxv.jpg


I sourced the relays on Amazon. They seemed to be the cheapest and I got them in 2 days. I bought 8 of them. They have a nice mounting tab on the top. This is the most expensive part of the mod.

Amazon.com: Metra Install E-123 Bay Tyco Relay 12 Volt 30 Amp Each: Car Electronics

These are SPDT relays. (Single Pole, Double Throw) 20/30 amp rating. The 20 amp rating is for the NO (Normally Open) position. This is the how the relay is rated when it isn't energized. The 30 amp rating is for when the relay is energized. Since the relay will carry current when energized and not energized, both ratings are important.

There's lots of cheap relays out there.. The ones to buy are the Tycos (formally Bosch). You can ID them by a couple things. First is they are marked TE on the top. Amp rating and voltage is there too. They are marked "Made in Portugal" on the side. Nobody makes these in the USA.

34ACFF22-B195-4DD7-AED3-F84619B28587_zpsgirhixn3.jpg


21934CA9-AB7C-41E1-BF4C-D560C4705F8F_zpsaky3vrom.jpg


More to come....
 
Next I needed a harness and the plugs for the relays. I bought these on Ebay. You need 4, but I bought 5.

UL APPROVED DUAL RELAY SOCKET, DESIGNED FOR ALL TYPES OF DOOR LOCKS FREE SHIPPIN | eBay

s-l1600.jpg


These plugs have 12" wires. Just long enough. I had to change half the wires, but it still saved me some work. These are pre-wired for door locks, but they will work.

The wires I'm going to use to power the window motors are a little too small. I removed all those wires and substituted 12 gauge wires.

The wires marked in yellow were removed.

harness%201_zpsmpn1qgcp.jpg


To remove the wires, I pushed an awl into the front of the connector and pushed down the little tab on the spade.

7B189C00-8FC5-4F59-AABD-D2F47299483F_zps8ctryqlr.jpg


I used a similar (although better quality than shown) spade connector for the new wires. I had them on the shelf.

87B3038D-90AA-437C-AB12-667DE159B9CE_zpsmm1m1kl6.jpg
 
To plug into the existing harness, I needed some connectors. Packard 56 are the ones to get. I bought these. You'll need 4 of each, but I bought larger batches.

Metri-Pack 2-Way Female Connectors, Black, 56 Series Delphi 3973781 10 EACH | eBay

s-l1600.jpg


and these.

Metri-Pack 2-Way Male Connectors, Black, 56 Series Delphi 2984883 10 EACH | eBay

s-l1600.jpg


and these.

DELPHI PACKARD 2989877 GM 56 SERIES FEMALE TERMINAL 12 GA. PKG OF 25 | eBay


s-l1600.jpg


and these.

DELPHI PACKARD 2971859 GM 56 SERIES MALE TERMINAL 12 GA. PKG OF 25 | eBay

s-l1600.jpg


If you search that same seller, they have smaller packages and combo deals. I like to have this stuff on the shelf.
 
I cut some 12" lengths of 12 gauge wire. I used what I had in colors... In fact, I screwed up and meant to use the yellow wire for power (to match the existing harness), but I had them cut, and it wasn't worth scrapping the wire.


4E789EEF-A122-4210-8B83-D33755C6712E_zpses1ttwq4.jpg


Removed wires.

63C36AA5-8082-4692-923E-BABADEF9F0A9_zpsb07ypia9.jpg


New wires installed.

ABC7FA62-9F9D-4F0F-80A0-A0D7A083ADD0_zpslrqn8wet.jpg


08C0CAC1-83A6-4E5E-A956-3AF9ACCCF2C4_zpsdijoej2b.jpg


Finished harness. I wrapped it with non-adhesive electrical tape. Chrysler used this type of tape throughout the car and it's great if you have to unwrap the harness.

72688141-5330-4C5C-8DF3-B7631AE2BFCA_zpsk4hskt4l.jpg


I buy in on Ebay.

55-96 Pontiac electrical wiring tape NON ADHESIVE Factory Correct 2 ROLLS new | eBay
 
Time to put it in the car.

I needed a good 12volt power source. There were two options. One was to run new wires to the doors from a good source. That sounded like a PITA to me, especially running new wires to the doors.

The other option was to use what was already there. Each window has a direct 12 volt source that is hot any time the ignition is on. Under the dash is a circuit breaker and relay that powers the windows. It doesn't run through any switches and as I see it, it's good for this.

I spliced into the yellow wire here.

C20F7E67-DFEA-41D7-B063-1A3E5C53FD73_zps7zadsgov.jpg


BTW, that's 3M rubber splicing tape over the splice. It's the best stuff I've used for this. You have to peel a backing and stretch it and them it sticks to itself. Great stuff.

Amazon.com: 3M Rubber Splicing Tape: Home Improvement

91yX5V74dTL._SL1500_.jpg


Since the harness kind of sits in the door, I wrapped it with friction tape. BTW, this tape is still from the box of it my Dad had... It's at least as old as my car, if not older.

7B566E4A-9324-430B-A901-E33EB9BAF9E1_zpsbhkuiduw.jpg


Relays are mounted and ground wires attached to door.

826C9B78-1D70-46F0-8796-AA11196D0750_zpsx1lqwsvp.jpg


Not a great video. The window is faster and seems more "positive" in its action.

th_9D113F2C-569E-4F9D-845F-07384B4740D9_zpsyi1f9f9l.jpg
 
Last edited:
Awesome write up, I was planning on doing this next winter. Thanks for sharing all the details and sources for materials.
 
Nice job. Luckily I don't have to deal with power windows that much. Heck, not even the headlights, as I don't really drive the cars at night, but did that anyway. I used conduit instead of tape to protect the new lines up front and not need to take tape off even though I have most of those tapes. I like those connectors for the relays but, like you, would need to change out those wires for 12 gauge minimum. The power wires, in my use, are 10 gauge.

10-Length-1-2-Width-Split-Loom-Wire-Cable-Flexible-Tubing-Wire-Conduit-Hose-Cover-Car.jpg
Pol_relay_01.jpg
 
Nice job. Luckily I don't have to deal with power windows that much. Heck, not even the headlights, as I don't really drive the cars at night, but did that anyway. I used conduit instead of tape to protect the new lines up front and not need to take tape off even though I have most of those tapes. I like those connectors for the relays but, like you, would need to change out those wires for 12 gauge minimum. The power wires, in my use, are 10 gauge.

View attachment 124223 View attachment 124224
Yep, the plastic conduit is another good choice.
 
Outstanding Big_John... but we've come to expect as much from you... I take it this is an indication that you are fully mobile again?
 
Outstanding Big_John... but we've come to expect as much from you... I take it this is an indication that you are fully mobile again?
Not quite fully mobile. Mrs. Big John is progressing well, but I still need to be close to home. I can get out to the garage a bit now and I can leave her alone enough to go to the store. I'm getting really tired of my cooking though...

Most of this was done at the kitchen table.. and I've only done one door so far.
Glad to hear of the progress, send her best wishes from the C Body crowd...

The cooking part I can't help much with, but can relate to. It seems the few things I could cook and think I had done a good job, are now off my diet. Folks who like to cook are weird, but great to have around.:rolleyes:
 
Very nice. I just went through a power window harness repair exercise too.

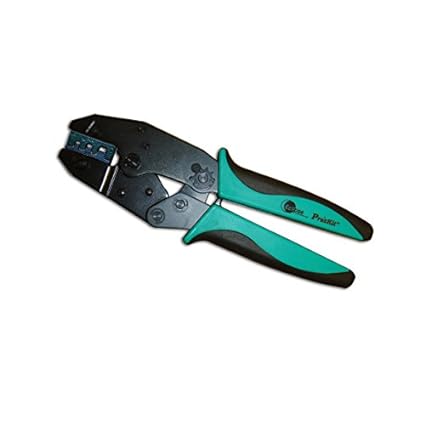
Finding the correct crimping pliers for the open barrel type terminals has proven to be the most difficult task, though.

Where did you get yours? Marcia at RI Wire told me their source for tools, and I wrote it down somewhere, but then misplaced it!
I bought one of these:
Eclipse Tools 300-005 Pro's Kit AWG 20-10 Ratcheted Crimper, Non-Insulated, Open Barrel Terminals: Automotive Electrical System Tools: Amazon.com: Industrial & Scientific

41itV2G9YBL._SX425_.jpg


It's OK, not great, but OK.
 
I liked the sockets for the relays but not the wiring associated with them so I went looking. I thought there must be bare sockets available and sure enough they are.
Ten sockets with fifty terminals for $25 seems pretty good.

Amazon.com: Ehdis 30A /40A 5 Pin Relay Connector Socket with 5 x 6.3mm Terminals, Car Truck Vehicle Relay Case Holder, pack of 10: Electronics

View attachment 124251
Those are nice because they can link to each other. There's a t slot on the end that you can snap the adjacent terminal in.
 
Very nice work & descriptions to us on how it is done. The finished product looks very neat too.
 
Makes my hands sore just thinking about it but something worth doing is worth doing right!:thumbsup:
 
Back
Top