Can this back seat panel be successfully reinforced?

Zymurgy

Old Man with a Hat
FCBO Gold Member
Joined
Sep 14, 2012
Messages
6,636
Reaction score
7,478
Location
London, Ohio
Here is the situation. I have started dissembling the interior. I have come across that some idiot tried to remove the back panel without first removing the seats and literally tore a section of the panel that was mounted to a bracket for support. They also ripped a crack at the arm rest where they obviously trying to yank it out of the car.

I little side note, I have a theory on most of the bumps and dents on the car. First, I found out over the holidays from the PO that the first owner has actually passed way (the one on the Certicard) I was really hoping to have a chance to meet her. I found out that her son drove it a year in college and that it was in great shape before he got ahold of it.

Anyway back to my theory, there was one of many dents on the passenger side, one behind this panel. This may have been one of the first they tried to pound out from the inside. I can see some frat boy buddy of his say I can fix that before your Mom would ever see it, for a 6 pack of beer, take 2 screws out and then yank on it until he tore it out.

OK now that I totally hijacked my own thread the actual question. Can I make a repair to restore the integrity of the panel? I don’t even have the bracket but I could fabricate one if I can't find one, but the piece of the panel is gone too. One of the advantages of the repair, is it would be completely behind the seat so it would not have to be perfect.
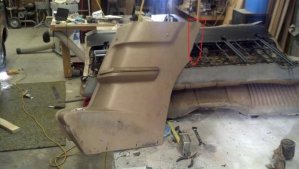
Back panel damage.sm.jpg

This photo shows the left side and how it's mounted in the car and what I would like to repair.

Back panel bracket.sm.jpg


Back panel damage.sm.jpg
 
Last edited:
Mike: I've taken Stan's approach with some success albeit I've had all the broken pieces to puzzle together. Another approach I've used is to scavange some hard plastic panel pieces out of a wrecking yard. Any large curved pieces will do. Using a combo of the correct glue/rivets/screws use the scavanged pieces to form an approximate backing for the final contour of the finished piece. Then using 2 part epoxy putty create the final rough contour. Then go at it with the sandpaper and finally paint. This 2nd approach is a lot of time consuming fiddle work but in my experience yields the best results.
 
One of mine were broken. Being as they needed to be redyed, I let Just Dashes repair the broken one and it came out perfect. They used fiberglass cloth and resin, blended and redyed. You cant even tell it was broken.
 
My neighbor is a fiberglass man...25+ years. He can do some amazing things with glass. But I know from talking with him that these old, hard plastic pieces, they don't accept fiberglass all that well. The new glass, and resin, just won't adhere to the old plastic properly. He says there are some really expensive products that can do the job...but your looking at couple hundred dollars a quart.

I'm Not saying it can't be done, but maybe try a specialty fiberglass supply shop. And bring in some pieces of what your working on...maybe they can find something that will work?
 
Friend of mine is a dental technican. He put on the back of the glued pieces the flesh colored plastic that is used for dentures. Holds on to these plastic pieces very well and is very rigid. If you have anyone in this field try him.
 
If by chance you can find a donor piece of similar plastic to make a repair piece, here is a very interesting item on how to weld plastic using solvents.

http://blog.hemmings.com/index.php/2012/08/30/tech-tip-solvent-welding-plastics/
Tried that.
It works if the particles are almost like very fine sand and they DO need days to dissolve. It's not for spur of the moment repairs.
After a lot of frustrating efforts over the years I found this. It's expensive, but, like I say, it's the only method of joining two pieces of plastic that I have found that really works in the real world.

http://www.amazon.com/Weld-On-16-Ac...916&sr=8-2&keywords=weld-on+16+acrylic+cement
 
Thanks for all the great info. I am lucky that I actually have time on my side for this repair. I am having all my interior plastics dyed too so I should be in good shape.
 
I will keep the thread updated, but it might be a couple weeks before I tackle the problem. If it warms up I am going to head back out to the local junkyard with a New Yorker and pick up some screws and misc stuff, including some similar plastic to try and complete the repair.
Junk Yard New Yorker.sm.jpg

Junk Yard New Yorker.sm.jpg
 
My neighbor is a fiberglass man...25+ years. He can do some amazing things with glass. But I know from talking with him that these old, hard plastic pieces, they don't accept fiberglass all that well. The new glass, and resin, just won't adhere to the old plastic properly. He says there are some really expensive products that can do the job...but your looking at couple hundred dollars a quart.

I'm Not saying it can't be done, but maybe try a specialty fiberglass supply shop. And bring in some pieces of what your working on...maybe they can find something that will work?

This raises your key point... Are you dealing with plastic, or fiberglass?

If indeed it is fiberglass, then you can repair it with mat and resin. I would definitely use mat, and not cloth, as it will conform to unusual shapes, with no lifting wrinkles, causing air bubbles and an odd shaped repair and a weak repair. Also with layers, you can fill little pockets/missing chipped out areas, and section wise the completed repair will be solid, and not layers that could separate more easily if in a stressed area in case of trapped air, or just more brittle due to the lack of flexability and integrity of solid resin without fiberglass throughout.

When doing your fiberglass repair, if you are going to have a thick area to fill, cut about 3 layers worth of puzzle peices of mat, and do that round of resin and mat in layers, getting full absorption with no air bubbles. When you're done, clean your brush, container etc. with acetone, let everything harden, then repeat your steps, until you have built the area back to the necessary thickness.

IM000057.jpg

If you are dealing with plastic of some variety, I would take your piece to a body shop with a well known history of doing good bumper cover repair. They should have one tech trained guy there that can check to see what kind of plastic that you have, and know what variety of glues will work. They should have a cabinet full of products designated for bumper cover and plastic repair, and also should have adhesive patches to place on the inside after the initial repair that will further strengthen your fractured area.

IM000057.jpg
 
Last edited:
I wasn't signed in when I initially replied to your thread. It looks to be a simple fix, if you can find a section of simlar material.

If it is fiberglass, I would cut and fit your donor piece, tape a few paint sticks to the front side keeping it straight, then put 2 layers of mat on the backside and let it harden. Once it is set, you can grind the repair line to a gradual taper down and just touching the new fiberglass in the center. Then cut progressive sized puzzle pieces for layers that will make the front side high enough that it can be finished to a level surface.
 
Couple thoughts:

If you have to fabricate that attachment bracket, make it a little longer or wider, so that it attaches to the original part, as well as the fabricated repair, that way the repair is mostly cosmetic rather than structural, and the bracket acts as a splint to strengthen the joint. If the new mounting screws are in the area covered by the seat, obviously you can add as many as you need without anything showing (do keep the screwheads countersunk, as the seat back fits quite tightly between those two panels.)

However you fix it, make sure that upper corner is rounded and smooth as the top material will probably contact it when you put the top up & down.

If you decide to replace rather than repair, I'm pretty sure all 65-68 C-body convertibles used those same panels.
 
Last edited:
The key to repairing plastic parts is finding the right repair material. It can be a matter of trial and error. For example you can mix up a little fiberglass resin and put it on the inside of the panel and let it harden. After it's hard see if it peels off. If not it will work for the repair. If fiberglass doesn't work there are different plastic repair materials made by 3M, SEM and others. To reinforce the repair you can use fiberglass mat or cloth with these plastic repair materials too.
 
It looks like I won't be repairing my panel. Murray Park found one for me. I'm still curious about repairing plastic, maybe another time, thanks for all the great info
 
That's ok. If he said "I found out I like a Yugo Convert better and exchanged the Chrysler for it with a derby guy", that would be cruel. :)
 
Back
Top